There’s something incredibly satisfying about transforming simple ingredients into a meal that feels both nourishing and indulgent. I remember the first time I whipped up a batch of Palak Chilla – I was looking for a quick, healthy breakfast that wasn’t eggs or toast, and this vibrant green pancake immediately caught my eye. The aroma of fresh spinach and spices filling my kitchen was enough to convince me, and the taste? Pure delight. If you’re ready to ditch the breakfast rut and embrace a dish that’s packed with flavor and goodness, you’re in for a treat with this healthy Indian pancake!
Why you’ll love this dish
If your mornings often feel like a frantic rush, you’re not alone. That’s precisely why this Palak Chilla recipe is about to become your new best friend. It’s a remarkable dish because it seamlessly blends health with incredibly satisfying taste. We’re talking about a breakfast (or lunch, or light dinner!) that’s packed with the goodness of spinach, a fantastic source of vitamins and iron, all wrapped up in a savory, light pancake. It’s naturally gluten-free if you use besan (chickpea flour) and makes for a fantastic option if you’re looking for something wholesome that doesn’t feel heavy. Plus, it’s highly customizable, allowing you to tweak the spices to your preference. It’s perfect for busy weekdays when you need something quick yet nutritious, or even for a relaxed weekend brunch.
> “I used to struggle finding healthy breakfast options my kids would actually eat. Then I tried this Palak Chilla recipe, and it’s been a game-changer! They love the vibrant color, and I love that they’re getting their veggies.” – A Happy Home Cook
The cooking process explained
Making Palak Chilla is surprisingly straightforward, even if you’re new to Indian cooking. The core idea involves blending fresh spinach with chickpea flour (besan), water, and a medley of aromatic spices to create a smooth, pourable batter. This batter is then spread thinly on a hot griddle, much like a crepe or a pancake, and cooked until golden and slightly crispy on both sides. The magic truly happens when the besan binds with the spinach, creating a delightful texture that’s both soft and firm. It’s a quick cooking process, meaning you can have a warm, fresh chilla ready in minutes once your batter is prepared.
What you’ll need
Gathering your ingredients for Palak Chilla is super simple; you likely have most of these in your pantry already!
- Fresh Spinach: About 2 cups, packed. This is the star of the show, providing that beautiful green color and vital nutrients.
- Besan (Chickpea Flour): 1 cup. The base of our pancake, giving it structure and a slightly nutty flavor. Make sure it’s fresh for the best result.
- Water: Approximately 1 cup, or as needed to achieve a smooth, pourable batter.
- Green Chillies: 1-2, depend on your spice preference, finely chopped. Adds a lovely kick.
- Ginger: 1 inch piece, grated or finely minced. For a warm, aromatic touch.
- Cumin Powder: 1/2 teaspoon. Earthy and essential.
- Turmeric Powder: 1/4 teaspoon. For color and its anti-inflammatory properties.
- Asafoetida (Hing): A tiny pinch (about 1/8 teaspoon). Optional, but it aids digestion and adds a subtle savory depth.
- Salt: To taste.
- Oil or Ghee: For cooking the chillas. Any neutral oil works, or ghee for a richer flavor.
(Quick note on ginger and chili: Feel free to adjust these to your exact liking. If you prefer less spice, deseed the chili or use less. For an extra zing, don’t hesitate to add a little more ginger!)
Directions to follow
Let’s get cooking! Follow these clear steps to create your delicious Palak Chilla:
- Prepare the Spinach: Thoroughly wash the fresh spinach leaves. You can either finely chop them or, for a smoother batter, blanch them briefly in hot water (about 1 minute) and then refresh them in cold water before blending. If blanching, squeeze out excess water.
- Blend the Batter: In a blender or food processor, combine the chopped/blanched spinach, besan, green chillies, ginger, cumin powder, turmeric powder, asafoetida (if using), and salt.
- Add Water Gradually: Start by adding about half a cup of water, then blend. Continue adding water in small increments until you achieve a smooth, pourable batter consistency – similar to dosa or crepe batter. It shouldn’t be too thick or too runny.
- Rest the Batter (Optional but Recommended): Let the batter rest for 10-15 minutes. This allows the besan to fully absorb the liquid and results in softer chillas.
- Heat the Griddle: Place a non-stick pan or cast-iron griddle over medium heat. Once hot, lightly grease it with a little oil or ghee.
- Pour and Spread: Pour a ladleful of batter onto the hot griddle. Using the back of the ladle, spread the batter gently in a circular motion to form a thin, even pancake.
- Cook Each Side: Drizzle a little oil or ghee around the edges and on top of the chilla. Cook for 2-3 minutes until the underside turns golden brown and crispy.
- Flip and Cook: Carefully flip the chilla over and cook for another 1-2 minutes until the other side is also cooked and has light brown spots.
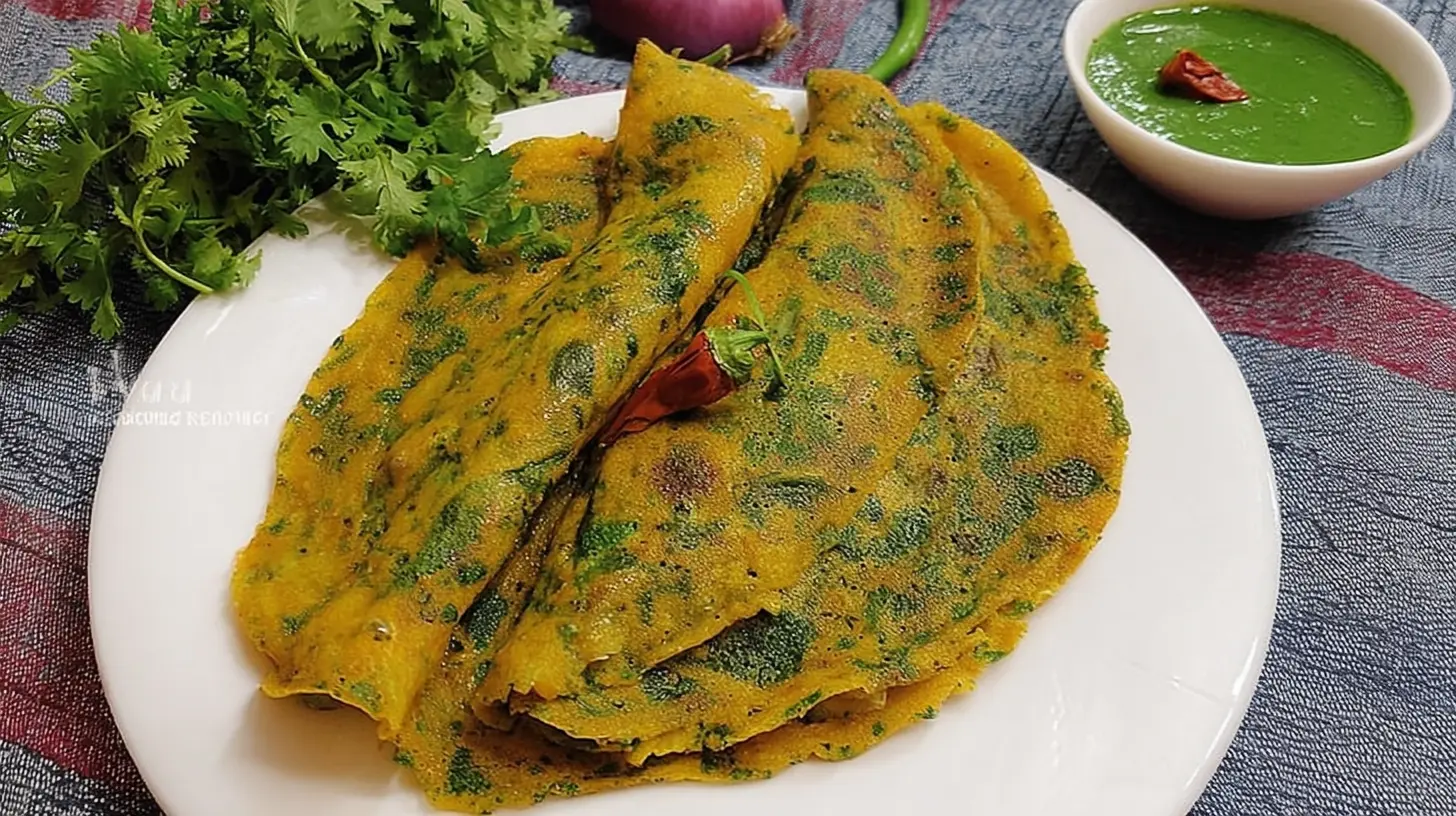
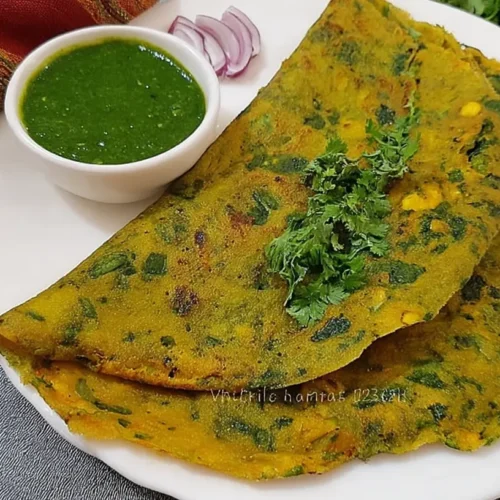
- Serve Hot: Remove the cooked chilla from the griddle and repeat the process with the remaining batter. Serve immediately.
How to plate and pair
Palak Chilla is wonderfully versatile and truly shines when served fresh and warm. For a classic experience, I love serving them with a dollop of plain yogurt or a side of mint chutney (pudina chutney). The coolness of the yogurt or the refreshing kick of the chutney perfectly complements the savory, slightly spiced chilla. You could also offer a simple tomato ketchup for the younger ones, or a tangy pickle for those who enjoy an extra burst of flavor. For a more substantial meal, consider pairing it with a small bowl of sambhar, a delicious lentil and vegetable stew, or even a side of quick cucumber salad for added freshness and crunch. Don’t forget a hot cup of chai or coffee to complete your breakfast experience!
Keeping leftovers fresh
While Palak Chillas are best enjoyed fresh off the griddle, sometimes you might have a few leftovers or want to prep ahead.
- Storage: Allow any leftover chillas to cool completely to room temperature. Stack them with a piece of parchment paper in between to prevent sticking, then store them in an airtight container in the refrigerator for up to 2-3 days.
- Reheating: To reheat, you can quickly warm them in a lightly oiled pan over medium heat until heated through and slightly crispy again, or microwave them briefly until warm. If microwaving, they might lose a bit of their crispness but will still taste great.
- Freezing: I don’t typically recommend freezing chillas as the texture can become a little gummy once defrosted. However, you can prepare the batter ahead of time and store it in an airtight container in the fridge for up to 24 hours. Just give it a good stir before cooking!
Helpful cooking tips
Achieving that perfect Palak Chilla is all in the details! Here are a few invaluable tips to ensure yours turn out spectacular every time:
- Batter Consistency is Key: This is probably the most crucial aspect. If the batter is too thick, your chillas will be doughy and hard to spread. Too thin, and they’ll tear easily. Aim for a consistency like thick pouring cream or thin pancake batter. Add water little by little until you get it right.
- Don’t Overcrowd the Pan: Let each chilla have its space. Cooking one or two at a time (depending on your griddle size) ensures even cooking and browning.
- Medium Heat is Your Friend: If the pan is too hot, the chilla will burn before cooking through. If it’s too cool, it won’t get that lovely golden crisp. Medium heat with a well-preheated pan is ideal.
- Resting the Batter: While optional, a 10-15 minute rest truly makes a difference. It gives the besan time to fully hydrate, leading to a smoother texture and better-tasting chillas.
- Taste Test the Batter: Before cooking, taste a tiny bit of the batter (just make sure it’s not raw if you’ve added any raw greens that shouldn’t be consumed uncooked, though spinach is generally fine). Adjust salt and spices as needed.
- Oil Generously: Don’t skimp on the oil or ghee when cooking. It helps with crispiness, prevents sticking, and adds flavor.
Creative twists
One of the best things about Palak Chilla is its adaptability! Here are a few ways to get creative with your recipe:
- Add More Veggies: Finely grated carrots, chopped onions, bell peppers, or even corn can be mixed into the batter for an extra nutritional boost and textural variety.
- Spice It Up Differently: Experiment with other spices! A pinch of garam masala, carom seeds (ajwain) for digestion, or finely chopped fresh fenugreek leaves (methi) can add wonderful new dimensions.
- Cheese Please! For a kid-friendly (or adult-friendly!) twist, sprinkle a little grated cheese (cheddar, mozzarella, or even paneer) on top of the chilla just after flipping it. Cover for a minute to let the cheese melt.
- Protein Boost: You can stir in a tablespoon of finely crumbled paneer (Indian cottage cheese) or even some nutritional yeast into the batter for added protein and flavor.
- Make Mini Chillas: For appetizers or smaller portions, make smaller, silver-dollar sized chillas. They’re great for dipping!
- Herbal Infusion: Mix in finely chopped fresh coriander (cilantro) or mint leaves into the batter for a burst of fresh herb flavor.
Common questions
Can I use frozen spinach instead of fresh?
A: Yes, you absolutely can! If using frozen spinach, make sure to thaw it completely and squeeze out as much excess water as possible before blending. This prevents the batter from becoming too watery.
My chillas are sticking to the pan. What can I do?
A: This usually happens if the pan isn’t hot enough, if it’s not seasoned well, or if you haven’t used enough oil. Ensure your non-stick pan is adequately heated before pouring the batter. If using a cast iron griddle, make sure it’s well-seasoned and oiled generously. You can also try adding a tiny bit more oil to the pan before each chilla.
Why are my chillas not getting crispy?
A: Several factors can affect crispiness. The batter might be too thick (add a little more water), the pan might not be hot enough, or you might not be cooking them long enough. Also, ensure you use enough oil or ghee around the edges and on top while cooking. Don’t rush the process; let them cook until they’re nicely golden-brown.
Is this recipe gluten-free?
A: Yes, as long as you use 100% besan (chickpea flour), this recipe is naturally gluten-free, making it a great option for those with gluten sensitivities.
Classic Palak Chilla Recipe | Spinach Cheela
Equipment
- Blender
- Large mixing bowl
- Whisk
- Non-stick griddle or tawa
- Ladle
Ingredients
Main Ingredients
- 2 cups Fresh Spinach packed
- 1 cup Gram Flour (Besan)
- 1 cup Water (plus more as needed)
- 1-inch piece Ginger peeled and roughly chopped
- 1 Green Chili (optional, adjust to taste)
- ½ teaspoon Cumin Powder
- ¼ teaspoon Turmeric Powder
- Salt to taste
- Oil or Ghee for cooking
Instructions
Preparation
- Wash the spinach thoroughly. In a blender, combine spinach, ginger, and green chili with ¼ cup water and blend until smooth and bright green.
- In a large bowl, whisk together gram flour, cumin powder, turmeric powder, and salt. Gradually add the spinach paste and remaining water, whisking until you have a smooth, flowing batter.
- Cover the batter and let it rest for 10-15 minutes to allow the gram flour to absorb the liquid.
- Heat a non-stick griddle over medium heat and lightly grease it with oil or ghee.
- Pour a ladleful of batter onto the hot griddle, spreading it outwards in a circular motion to form a thin round. Drizzle oil or ghee around the edges.
- Cook for 2-3 minutes until golden brown, then flip and cook for another 1-2 minutes until both sides are cooked through and serve hot.