I remember those chaotic weeknights all too well – staring into the fridge, utterly uninspired, and knowing I needed to get something on the table fast. That’s where chicken thighs became my dinner superhero. They’re forgiving, flavorful, and incredibly versatile. In this article, I’m going to share not just an easy way to cook them, but four fantastic dinner ideas that stem from one simple preparation method, helping you banish dinner dilemmas for good.
Why you’ll love this dish
If you’re anything like me, you’re constantly on the hunt for recipes that deliver big on flavor without demanding hours in the kitchen. This approach to cooking chicken thighs is exactly that. It’s incredibly forgiving, meaning even if you’re a novice cook, you’ll achieve juicy, tender results every time. Plus, chicken thighs are generally more budget-friendly than breasts, making them a smart choice for feeding the family without breaking the bank. This recipe isn’t just one meal; it’s a springboard for four distinct, delicious dinners, perfect for banishing weeknight dinner boredom.
> “I used to shy away from cooking chicken thighs, but this recipe changed everything! So easy and every idea was a hit with my family. Definitely a new go-to!” – A happy home cook
Preparing Easy Weeknight Chicken Thighs
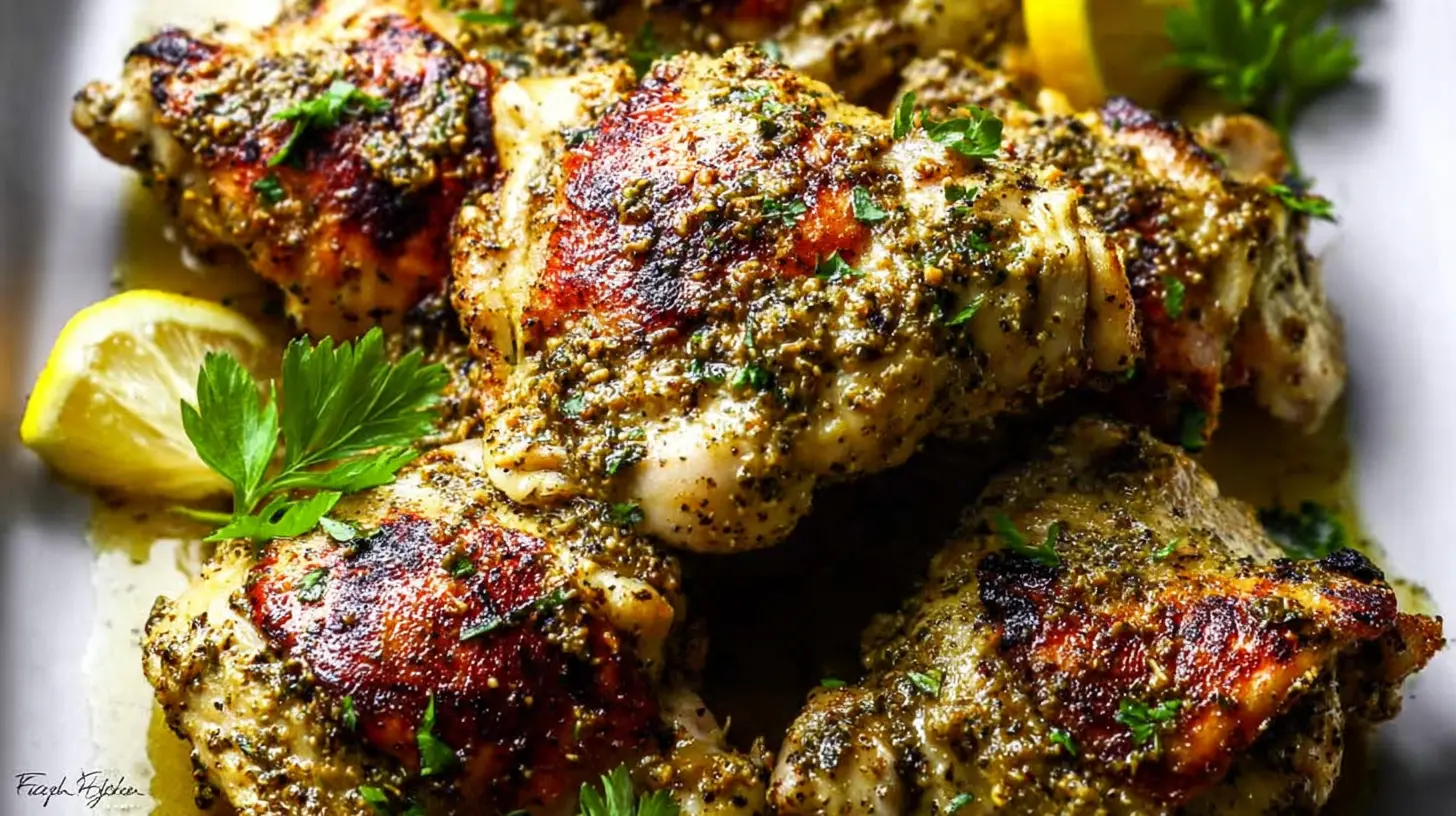
The magic of these dinner ideas starts with a super simple, universally delicious way to prepare the chicken thighs. We’re going for maximum flavor with minimal effort. First, you’ll want to pat your chicken thighs dry – this is crucial for getting that lovely, crispy skin (if you leave it on). Then, a quick seasoning blend goes a long way. After that, it’s a simple sear and bake technique that ensures perfectly cooked chicken ready for its various culinary adventures.
What you’ll need
Key Ingredients
- Bone-in, skin-on chicken thighs: (About 1.5 – 2 lbs, 4-6 pieces) – The star of our show! Skin-on adds flavor and crispiness, but boneless, skinless can work too (adjust cooking time).
- Olive oil: (1-2 tablespoons) – For searing and flavor.
- Paprika: (1 teaspoon) – Adds a lovely color and mild, smoky depth.
- Garlic powder: (1/2 teaspoon) – A staple for quick flavor.
- Onion powder: (1/2 teaspoon) – Another flavor booster.
- Dried oregano (or Italian seasoning): (1/2 teaspoon) – Herby goodness.
- Salt: (1 teaspoon, or to taste) – Essential for seasoning.
- Black pepper: (1/2 teaspoon, or to taste) – A touch of spice.
Directions to follow
- Prep the Chicken: Take your chicken thighs out of the fridge about 15-20 minutes before cooking to bring them closer to room temperature. Pat them thoroughly dry with paper towels. This step is key for crispy skin!
- Season Generously: In a small bowl, mix together the paprika, garlic powder, onion powder, dried oregano, salt, and black pepper. Drizzle the chicken thighs with olive oil, then sprinkle the seasoning mixture all over, rubbing it in gently to ensure even coverage on both sides.
- Sear for Color: Heat a large, oven-safe skillet (cast iron works wonderfully) over medium-high heat. Once hot, add the chicken thighs, skin-side down. Sear for 5-7 minutes until the skin is deeply golden brown and crispy.
- Flip and Finish: Flip the chicken thighs over.
- Bake to Perfection: Transfer the entire skillet to a preheated oven at 400°F (200°C). Bake for 15-20 minutes, or until the internal temperature of the thickest part of the thigh reaches 165°F (74°C) on an instant-read thermometer.
- Rest and Get Creative: Remove the skillet from the oven and let the chicken rest for 5 minutes before slicing or shredding. This helps the juices redistribute, keeping the chicken moist. Now, proceed with one of your four dinner ideas!
Best ways to enjoy it
This basic chicken thigh recipe is fantastic on its own, but here are the four dinner ideas I promised, showing you just how versatile it can be:
- Classic Roast Chicken Dinner: Serve the chicken thighs alongside some roasted vegetables (like potatoes, carrots, and broccoli, which you can often roast in the same oven, perhaps on a separate tray). A simple side salad completes this wholesome meal.
- Shredded Chicken Tacos/Bowls: Once cooked, shred the chicken from the bone. Toss it with a squeeze of lime juice and a pinch more chili powder or cumin. Use it as a filling for soft tacos with your favorite toppings (pico de gallo, avocado, cheese) or as the protein base for a hearty rice bowl.
- Chicken & Pasta Medley: Shred the cooked chicken. While it’s baking, cook your favorite pasta. Sauté some garlic and cherry tomatoes in a separate pan, then toss with the cooked pasta, shredded chicken, a handful of fresh spinach, and a sprinkle of Parmesan cheese for a quick and flavorful pasta dish.
- Flavor-Packed Chicken Salad: Let the cooked chicken cool completely, then dice or shred it. Mix with a dollop of mayonnaise, a spoonful of Dijon mustard, finely chopped celery, red onion, and fresh herbs like dill or parsley. Serve on crusty bread, in lettuce cups, or over a bed of mixed greens for a refreshing, protein-packed lunch or light dinner.
Storage and reheating tips
Cooked chicken thighs can be a lifesaver for meal prep. Once they’ve cooled completely, store them in an airtight container in the refrigerator for up to 3-4 days.
To reheat, the best method really depends on how you plan to use them.
- For crispy skin (if intact): Pop them back into a preheated oven at 350°F (175°C) for about 10-15 minutes, or until warmed through.
- For shredded/diced chicken: Gently warm in a skillet on the stovetop with a splash of broth or water to prevent drying out, or microwave in short bursts, stirring in between.
- Freezing: Cooked chicken thighs can also be frozen for up to 2-3 months. I recommend freezing them bone-in if possible, as this helps retain moisture. Thaw overnight in the refrigerator before reheating.
Helpful cooking tips
- Don’t overcrowd the pan: When searing, give the chicken thighs space. If your skillet isn’t large enough for all of them in a single layer, cook them in batches. Overcrowding steams the chicken instead of searing it, preventing that coveted crispy skin.
- Pat dry, every time: This cannot be stressed enough! Excess moisture on the chicken skin is the enemy of crispiness.
- Season generously: Chicken thighs love flavor. Don’t be shy with the salt, pepper, and herbs.
- Resting is key: Just like any cooked meat, letting the chicken rest for a few minutes after it comes out of the oven allows the juices to redistribute, resulting in a more tender and juicy final product.
- Broiler for extra crisp: If your chicken skin isn’t quite as crispy as you’d like after baking, you can briefly place it under a preheated broiler for 1-2 minutes. Watch it very closely to prevent burning!
Creative twists
The beauty of this easy chicken thigh recipe is how adaptable it is. Here are a few ways you can switch things up:
- Spice it up: Add a pinch of cayenne pepper, red pepper flakes, or a dash of your favorite hot sauce to the seasoning mix for a fiery kick.
- Herb variations: Swap out the oregano for dried thyme, rosemary, or a blend of “herbes de Provence” for a different aromatic profile. Fresh herbs, added at the end, are also wonderful.
- Citrus burst: Add lemon zest to your seasoning blend or squeeze fresh lemon juice over the cooked chicken for a bright, tangy finish.
- Marinade magic: For an extra layer of flavor, consider marinating the chicken thighs for 30 minutes to a few hours in a simple mixture of olive oil, lemon juice, garlic, and herbs before searing and baking.
Common questions
How do I know when the chicken thighs are cooked through?
The safest way is to use an instant-read meat thermometer. Insert it into the thickest part of the thigh, avoiding the bone. The chicken is fully cooked when it reaches an internal temperature of 165°F (74°C).
Can I use boneless, skinless chicken thighs instead?
Absolutely! Boneless, skinless chicken thighs will cook faster. You’ll still want to sear them for a few minutes per side until golden, then bake for about 10-15 minutes, or until they reach 165°F (74°C) internally. Keep an eye on them to prevent overcooking, as they can dry out more easily without the bone and skin.
What if I don’t have an oven-safe skillet?
No problem! You can sear the chicken thighs as directed in a regular skillet on the stovetop. Once seared, carefully transfer them to a baking dish or sheet pan and then proceed with baking in the oven.
Can I prepare the chicken ahead of time?
Yes! You can season the chicken thighs up to 24 hours in advance and store them in the refrigerator. This actually helps the flavors meld even more deeply. Just pull them out about 15-20 minutes before cooking to let them come closer to room temperature.
Classic Crispy Weeknight Chicken Thighs
Equipment
- Paper towels
- Large oven-safe skillet (cast iron recommended)
- Cutting board
- Meat thermometer
Ingredients
Main Ingredients
- 4-6 bone-in, skin-on chicken thighs
- 1 tbsp olive oil
- 1 tsp smoked paprika
- 1 tsp garlic powder
- 1 tsp onion powder
- 1 tsp dried thyme or oregano
- Salt to taste
- Freshly ground black pepper to taste
- 1 lemon for squeezing
- Fresh parsley for garnish
Instructions
Preparation
- Pat the chicken thighs dry with paper towels, then season both sides generously with salt, pepper, smoked paprika, garlic powder, onion powder, and dried thyme or oregano.
- Heat a large, oven-safe skillet (like cast iron) over medium-high heat and add olive oil.
Cooking
- Place chicken thighs skin-side down in the hot skillet and cook for 6-8 minutes without moving them, until the skin is deeply golden brown and crispy.
- For a stovetop finish, flip the chicken, reduce heat to medium, and cook for 10-15 more minutes until an internal temperature of 165°F (74°C) is reached.
- For an oven finish, flip the chicken, then transfer the skillet to a preheated oven at 400°F (200°C) and bake for 15-20 minutes until an internal temperature of 165°F (74°C) is reached.
Serving
- Remove the chicken from the pan and let it rest for 5 minutes to redistribute the juices, then squeeze fresh lemon juice over the top and garnish with fresh parsley if desired.