I remember the first time I attempted a banana pudding trifle. It felt like a monumental task, visions of collapsing layers and soggy bananas haunting my kitchen. But then I stumbled upon a simpler approach, one that balanced homemade goodness with practical steps, and honestly, it changed my dessert game forever. If you’ve been yearning for that classic, comforting banana pudding flavor elevated into a show-stopping trifle, you’re in the right place. This recipe is all about achieving that perfect balance of creamy, dreamy pudding, sweet bananas, and crisp vanilla wafers, all without the fuss.
Why You’ll Love This Dish
There’s something undeniably magical about a banana pudding trifle. It’s more than just a dessert; it’s a hug in a bowl, a slice of Southern comfort, and a guaranteed crowd-pleaser. You’ll adore this particular recipe because it streamlines the process without sacrificing any of that beloved flavor. It’s perfect for a Sunday dinner, a potluck where you want to seriously impress, or even just a sweet treat to brighten a regular weeknight. Plus, who can resist those delightful layers? Each spoonful offers a delightful combination of textures—soft bananas, creamy pudding, and tender-crisp vanilla wafers. It’s also fantastic for feeding a group, making holiday gatherings or family reunions a breeze.
> “I thought making a trifle would be so complicated, but this banana pudding trifle recipe changed my mind! It’s surprisingly easy and tastes absolutely incredible. My family raves about it every time!” – A Happy Home Cook
The Cooking Process Explained
Creating this delightful banana pudding trifle involves a few straightforward stages. First, you’ll prepare a luscious, creamy homemade vanilla pudding – don’t worry, it’s easier than you think! While that cools, you’ll get your bananas ready and assemble your vanilla wafers. Then comes the fun part: layering. You’ll alternate between wafers, bananas, and that rich pudding, building a beautiful dessert that’s as pleasing to the eye as it is to the palate. Finally, a chill in the fridge allows all those flavors to meld beautifully, ensuring every bite is pure bliss.
What You’ll Need
Gathering your ingredients is the first step to banana pudding perfection. Here’s what you’ll need for this luscious trifle:
- For the Pudding:
- 1 cup granulated sugar
- 1/2 cup all-purpose flour
- 1/2 teaspoon salt
- 4 large egg yolks
- 2 cups whole milk
- 1/2 cup heavy cream
- 2 tablespoons unsalted butter
- 1 teaspoon vanilla extract
- For the Trifle:
- 6-8 ripe but firm bananas, sliced
- 1 (11-ounce) box vanilla wafers (about 75-80 cookies)
- Optional: 1 cup heavy cream, whipped with 2 tablespoons powdered sugar for topping
Directions to Follow
Let’s get this banana pudding trifle made! Follow these simple steps for dessert success:
- Make the Pudding Base: In a medium saucepan, whisk together the sugar, flour, and salt. In a separate bowl, whisk the egg yolks with the milk and heavy cream until well combined. Gradually pour the milk mixture into the dry ingredients in the saucepan, whisking constantly to prevent lumps.
- Cook the Pudding: Place the saucepan over medium heat, stirring constantly with a whisk. Bring to a gentle boil, then reduce heat to low and continue to cook, stirring, for 1-2 minutes until thick. The pudding should coat the back of a spoon.
- Finish the Pudding: Remove from heat. Stir in the butter and vanilla extract until fully melted and combined. Pour the pudding into a clean bowl, cover the surface directly with plastic wrap (this prevents a skin from forming), and let it cool completely to room temperature, or chill in the refrigerator for at least 2 hours until cold.
- Prepare Bananas & Wafers: While the pudding cools, slice your ripe bananas into 1/4 to 1/2-inch thick rounds. Have your vanilla wafers ready.
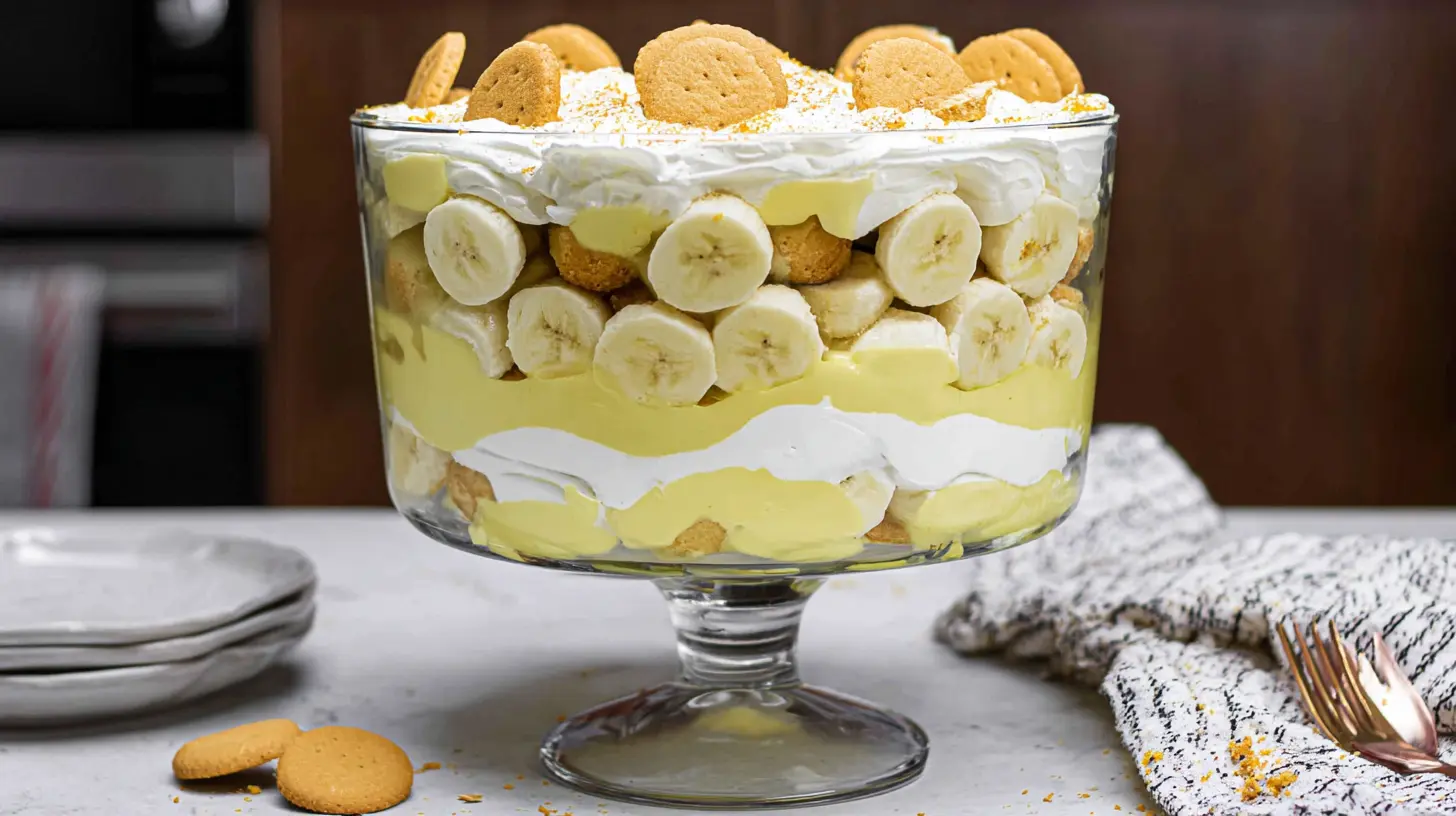
- Assemble First Layer: In a large trifle bowl (or a 9×13 inch dish if you don’t have a trifle bowl), arrange a single layer of vanilla wafers on the bottom. You may need to break some to fit.
- Add Bananas & Pudding: Top the wafer layer with about half of the sliced bananas, spreading them evenly. Spoon about one-third of the cooled pudding over the bananas, gently spreading it to cover.
- Repeat and Chill: Repeat the layering process: another layer of vanilla wafers, the remaining sliced bananas, and then another third of the pudding. Finish with a final layer of vanilla wafers and the remaining pudding. Cover the trifle lightly and refrigerate for at least 4 hours, or preferably overnight, to allow the flavors to meld and the wafers to soften. If desired, whip the heavy cream and powdered sugar, and dollop or pipe it on top before serving.
Best Ways to Enjoy It
This banana pudding trifle is truly a standalone star, but there are a few ways to enhance the experience. Serve it chilled, allowing the flavors to fully develop and the textures to reach their peak. For an extra touch of elegance, consider garnishing the top with a few fresh banana slices (tossed lightly in lemon juice to prevent browning), a sprinkle of crushed vanilla wafers, or even a light dusting of cinnamon. It’s absolutely perfect for a relaxed Sunday dessert, a festive gathering, or as a beloved contribution to any potluck or BBQ. A spoonful alongside a cup of coffee or a glass of cold milk is pure comfort.
How to Store & Freeze
Leftover banana pudding trifle should be covered tightly with plastic wrap and stored in the refrigerator. It’s best enjoyed within 2-3 days. Beyond that, the bananas might start to become too soft and discolor, and the wafers can get too mushy.
Freezing: Freezing banana pudding trifle isn’t generally recommended. The texture of the bananas can become very watery and mushy upon thawing, and the pudding itself can sometimes separate. It’s a dish best enjoyed fresh and chilled from the refrigerator. Always ensure proper refrigeration temperatures (below 40°F / 4°C) to maintain food safety.
Pro Chef Tips
- Ripe but Firm Bananas: This is crucial. Overripe bananas will turn mushy too quickly in the trifle, while underripe ones lack sweetness. Look for yellow bananas with a few small brown speckles.
- Cover the Pudding: When cooling your homemade pudding, make sure the plastic wrap touches the surface of the pudding directly. This prevents a “skin” from forming, keeping your pudding perfectly smooth.
- Chill Time is Key: Don’t rush the chilling! At least 4 hours, and ideally overnight, allows the vanilla wafers to soften to the perfect cake-like consistency and gives all those delicious flavors time to meld together.
- Layering Strategy: Try to make your pudding layers slightly thinner at the edges of the bowl and thicker in the middle. This helps showcase the other layers more clearly through the glass.
- Prevent Banana Browning (Optional): If you’re particularly concerned about your banana slices browning, you can very, very lightly toss them in a tiny bit of lemon juice or a fruit protector solution. However, since they’re mostly covered in pudding, this isn’t always necessary for this recipe.
Creative Twists
While the classic banana pudding trifle is divine as is, there are always ways to put your own spin on it:
- Chocolate Lover’s Delight: Introduce a layer of finely chopped bittersweet chocolate or chocolate chips. You could even swap half of the vanilla wafers for chocolate wafers.
- Caramel Swirl: Drizzle a little caramel sauce between the pudding layers for a banana-caramel twist.
- Nutty Crunch: Add a sprinkle of toasted pecans or walnuts between layers for an unexpected textural contrast.
- Spiced Pudding: Infuse your homemade pudding with a pinch of cinnamon or a tiny dash of nutmeg for a warmer flavor profile.
- Boozy Kick: For an adults-only version, you could lightly brush your vanilla wafers with a splash of rum or banana liqueur before layering.
FAQ
Q1: Can I use instant pudding instead of making it from scratch?
A: Yes, you absolutely can for a faster option! Use two (3.4 ounce) boxes of instant vanilla pudding, prepared according to package directions, typically with a little less milk than recommended for firming. While homemade offers a richer flavor and texture, instant pudding will still yield a delicious trifle.
Q2: How far in advance can I make this trifle?
A: It’s best to assemble the trifle at least 4 hours in advance to allow the wafers to soften, but no more than 24 hours. After a day, the bananas can start to get too soft and discolor, affecting the overall presentation and texture.
Q3: What if I don’t have a trifle bowl?
A: No problem at all! A large 9×13-inch baking dish or any deep, clear glass serving bowl will work perfectly. The beauty of a trifle is seeing the layers, so a clear dish is ideal, but not strictly necessary for taste.
Decadent & Easy Banana Pudding Trifle
Equipment
- Large mixing bowl
- Whisk
- Separate bowl
- Mixer (for cream cheese)
- Trifle bowl (or deep glass bowl)
- Plastic wrap
Ingredients
Pudding Mixture
- 2 packages instant vanilla pudding mix (3.4 ounce)
- 4 cups cold milk (Whole milk works best for a richer, creamier pudding.)
- 1 package cream cheese, softened (8 ounce)
- 1 can sweetened condensed milk (14 ounce)
- 1 container frozen whipped topping, thawed (12 ounce)
Layers
- 1 box vanilla wafers (12 ounce)
- 5-6 medium ripe bananas, sliced
Instructions
Pudding Base
- Whisk together instant vanilla pudding mix and cold milk for 2 minutes to thicken. In a separate bowl, beat softened cream cheese until smooth, then gradually beat in sweetened condensed milk until creamy.
- Gently fold half of the thawed whipped topping into the cream cheese mixture, then fold this mixture into the prepared vanilla pudding until smoothly combined.
Preparation
- Slice ripe bananas into ¼-inch thick rounds. Leave some vanilla wafers whole for layering and lightly crush about a third for sprinkling.
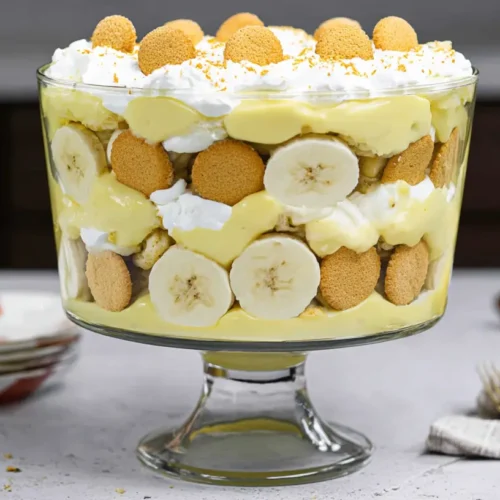
Assembly
- In a large glass trifle bowl, create layers: start with whole vanilla wafers, then sliced bananas, and then one-third of the pudding mixture.
- Repeat the layers (vanilla wafers, bananas, pudding) until finished, ensuring the top layer is pudding.
- Spread any remaining whipped topping over the top pudding layer and garnish with crushed or whole vanilla wafers.
Chill
- Cover and refrigerate for at least 4 hours, or ideally overnight, allowing flavors to meld and wafers to soften before serving.