The first time I bit into a cheesecake truffle, my world, or at least my dessert world, was forever changed. It was at a friend’s party, a tiny, unassuming sphere that exploded with creamy, tangy sweetness and a delightful crunch. I instantly knew I had to recreate that magic at home, and ever since, my kitchen has been a testing ground for all sorts of miniature cheesecake wonders. If you’re anything like me and have a soft spot for cheesecake but not always the time (or the appetite) for a whole cake, then you’re in for a treat.
What Makes These Cheesecake Truffles Special?
Why, you might wonder, should you dive headfirst into the world of cheesecake truffles? Well, let me count the ways! First off, they’re incredibly versatile. Whether you’re planning a sophisticated dinner party, a casual get-together, or just craving a bite-sized indulgence, these truffles fit the bill perfectly. They’re also an absolute godsend for portion control – no more guilt after devouring an entire slice of cheesecake! Plus, they’re surprisingly simple to make, often requiring no baking, which is a huge win on a hot day or when you’re short on oven space. Each recipe in this collection offers a unique spin, from classic vanilla bean to more adventurous flavor combinations, ensuring there’s something to tantalize every taste bud.
> “I thought making anything ‘cheesecake’ would be complicated, but these truffle recipes are a game-changer! So easy, and everyone raves about them. My new go-to for potlucks!” – Happy Baker on a popular recipe site.
How This Recipe Collection Comes Together
Creating these delightful cheesecake truffles is generally a straightforward process, focusing on mixing, chilling, and coating. You’ll typically start by combining softened cream cheese with various flavorings and binders, like crushed cookies or graham cracker crumbs. This mixture is then chilled until firm enough to roll into bite-sized balls. The final flourish involves coating these creamy centers in melted chocolate, sprinkles, chopped nuts, or even more cookie crumbs. While specific steps vary for each of the 10 recipes, the core principle remains consistent: minimal effort for maximum deliciousness.
Gather These Items
The beauty of cheesecake truffles often lies in their simplicity, requiring just a few key components. Here’s a general idea of what you’ll typically need, though ingredients will vary significantly across the 10 different recipes:
- Cream Cheese: Full-fat, softened, is crucial for that signature creamy texture.
- Sweetener: Powdered sugar is common for smooth incorporation; granulated sugar may also appear.
- Binder: Crushed graham crackers, vanilla wafers, or Oreos are popular choices, adding structure and flavor.
- Flavorings: Vanilla extract is a staple. Beyond that, think fruit zests, cocoa powder, nut butters, or even liqueurs.
- For Coating: High-quality melting chocolate (white, milk, or dark), sprinkles, finely chopped nuts, shredded coconut, or extra cookie crumbs.
- Optional: Butter (for certain crust-like binders), heavy cream for ganache coatings, food coloring for festive options.
Directions to Follow
Since this article highlights 10 different recipes, the directions will vary for each. However, here’s a generalized workflow that many cheesecake truffle recipes follow:
- Prepare the Base: In a large bowl, beat the softened cream cheese until smooth and creamy.
- Add Flavor and Sweetness: Gradually add powdered sugar and any primary flavorings (like vanilla extract or fruit zest), beating until thoroughly combined and no lumps remain.
- Incorporate Binder: Mix in the crushed cookies or graham crackers until the mixture holds together. It should be firm enough to roll but still pliable.
- Chill Time: Cover the bowl and refrigerate the mixture for at least 30 minutes to an hour. This step is crucial for making the truffles easy to roll.
- Roll the Truffles: Scoop out small portions (about 1 tablespoon each) and roll them into smooth balls between your palms. Place the rolled truffles on a parchment-lined baking sheet.
- Second Chill (Optional but Recommended): Place the rolled truffles back in the refrigerator or even the freezer for another 15-20 minutes. This helps them hold their shape when coated.
- Prepare Coating: Melt your chosen chocolate according to package directions (microwave or double boiler method). If desired, mix in colorings or other flavorings.
- Coat the Truffles: Dip each truffle into the melted chocolate, allowing any excess to drip off. You can use a fork or a dipping tool for this.
- Decorate: Immediately sprinkle with toppings like sprinkles, nuts, or extra crumbs before the chocolate sets.
- Final Chill: Return the coated truffles to the parchment-lined baking sheet and refrigerate until the chocolate is fully set, usually another 30 minutes.
Best Ways to Enjoy It
Cheesecake truffles are designed for enjoyment in almost any setting! They’re fantastic after-dinner bites, offering a sweet, satisfying finish without the commitment of a full dessert. Place them in mini cupcake liners or on a decorative platter for an elegant presentation. For celebrations like birthdays or holidays, arrange a colorful assortment for an eye-catching dessert spread. They also make wonderful edible gifts; simply package them in a pretty box or cellophane bag. And honestly, a single truffle or two with a cup of coffee or tea? Pure bliss for an everyday afternoon treat.
Keeping Leftovers Fresh
Storing your homemade cheesecake truffles properly is key to maintaining their deliciousness and ensuring food safety.
- Refrigeration: Always store cheesecake truffles in an airtight container in the refrigerator. Due to the cream cheese base, they should not be left at room temperature for extended periods (no more than 2 hours). They’ll stay fresh and delicious for up to 5-7 days when properly chilled.
- Freezing: Many cheesecake truffle recipes freeze beautifully! Once the chocolate coating is fully set, place the truffles in a single layer on a parchment-lined baking sheet and freeze for about an hour until solid. Then, transfer them to a freezer-safe airtight container or a heavy-duty freezer bag, separating layers with parchment paper. They can be frozen for up to 1-2 months.
- Thawing: To enjoy frozen truffles, simply transfer them from the freezer to the refrigerator an hour or two before serving, or let them sit at room temperature for about 15-20 minutes until slightly softened.
Helpful Cooking Tips
- Softened Cream Cheese is Non-Negotiable: This is probably the most important tip. If your cream cheese isn’t truly softened (take it out at least an hour before, or gently microwave for 10-15 seconds), you’ll end up with lumps in your mixture.
- Don’t Skimp on Chilling: Chilling the truffle mixture makes it manageable to roll. Don’t rush this step; a well-chilled mixture means smoother, perfectly shaped truffles.
- Use Good Quality Chocolate for Coating: Since the coating is a significant part of the experience, using good quality melting chocolate (or chocolate wafers specifically designed for melting) will give you a smoother, shinier finish that sets well. Avoid regular chocolate chips for dipping, as they often contain stabilizers that prevent smooth melting.
- Melt Chocolate Gently: Overheating chocolate can cause it to seize and become thick and grainy. Use a double boiler or microwave in short bursts (30 seconds at a time), stirring after each interval, until just melted and smooth.
- Work in Batches: When dipping, if you’re making a large batch, it helps to keep some truffles in the fridge while you work on coating others. This prevents them from warming up too much.
Creative Twists
The beauty of cheesecake truffles is how easily they adapt to different flavors and occasions. Here are a few ideas to spark your creativity:
- Fruity & Zesty: Incorporate lemon or lime zest directly into the cream cheese mixture, or add a teaspoon of fruit preserves (like raspberry or strawberry) for a swirl effect. Coat in white chocolate and garnish with finely chopped dried fruit.
- Nutty Indulgence: Mix in finely ground pistachios, pecans, or almonds into the base. For the coating, use milk chocolate and sprinkle with more chopped nuts. A swirl of almond or hazelnut extract can also elevate the flavor.
- Coffee Lover’s Dream: Add a teaspoon of instant espresso powder to the cream cheese mixture. Coat with dark chocolate and sprinkle with a few chocolate-covered coffee beans or a dusting of cocoa powder.
- Spiced & Cozy: For a fall-inspired treat, mix in pumpkin puree and pumpkin pie spice. Coat in white chocolate and dust with cinnamon, or add a ginger snap crumb coating.
- Boozy Bites: A splash of liqueur (like Kahlúa, Baileys, or Grand Marnier) can add a sophisticated kick to the cream cheese base. Ensure the amount is small so it doesn’t thin the mixture too much.
- Cookie Dough Fusion: Instead of graham crackers, crush up chocolate chip cookies or even edible cookie dough chunks into the cheesecake base for a double-dessert delight.
Common Questions
Q1: Can I make these cheesecake truffles ahead of time?
Absolutely! Cheesecake truffles are an excellent make-ahead dessert. You can prepare them completely and store them in an airtight container in the refrigerator for up to 5-7 days. Some recipes even suggest freezing them for longer storage, up to 1-2 months. This makes them perfect for party planning or having a quick sweet treat on hand.
Q2: What’s the best way to get a smooth chocolate coating without it being too thick?
For a smooth, thin coating, use good quality melting chocolate or chocolate wafers/callets designed for dipping. Melt the chocolate gently (either in a double boiler or in the microwave in 30-second increments, stirring well each time). If the chocolate seems too thick, you can add a tiny bit of neutral oil (like coconut oil or canola oil, about 1/2-1 teaspoon per cup of chocolate) or a small amount of paramount crystals while melting to thin it slightly. Ensure your truffles are well-chilled before dipping, as this helps the chocolate set faster and prevents the truffle from warming up too much.
Q3: Can I use low-fat cream cheese for these recipes?
While it might be tempting to lighten things up, using full-fat cream cheese is highly recommended for cheesecake truffles. Low-fat or fat-free cream cheese has higher water content and fewer milk fats, which can result in a softer, less stable, and sometimes grainier truffle base that doesn’t hold its shape as well and lacks that signature rich, creamy texture. For the best results and flavor, stick with the full-fat variety.
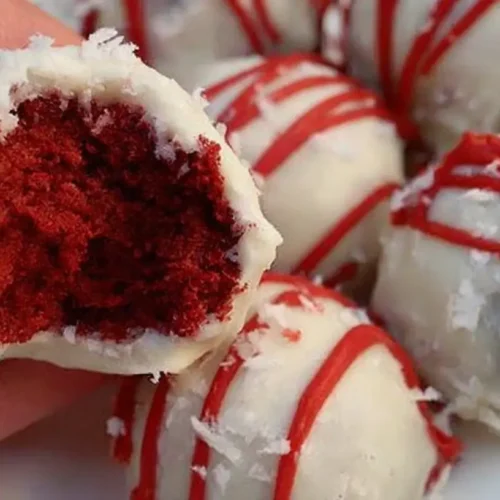
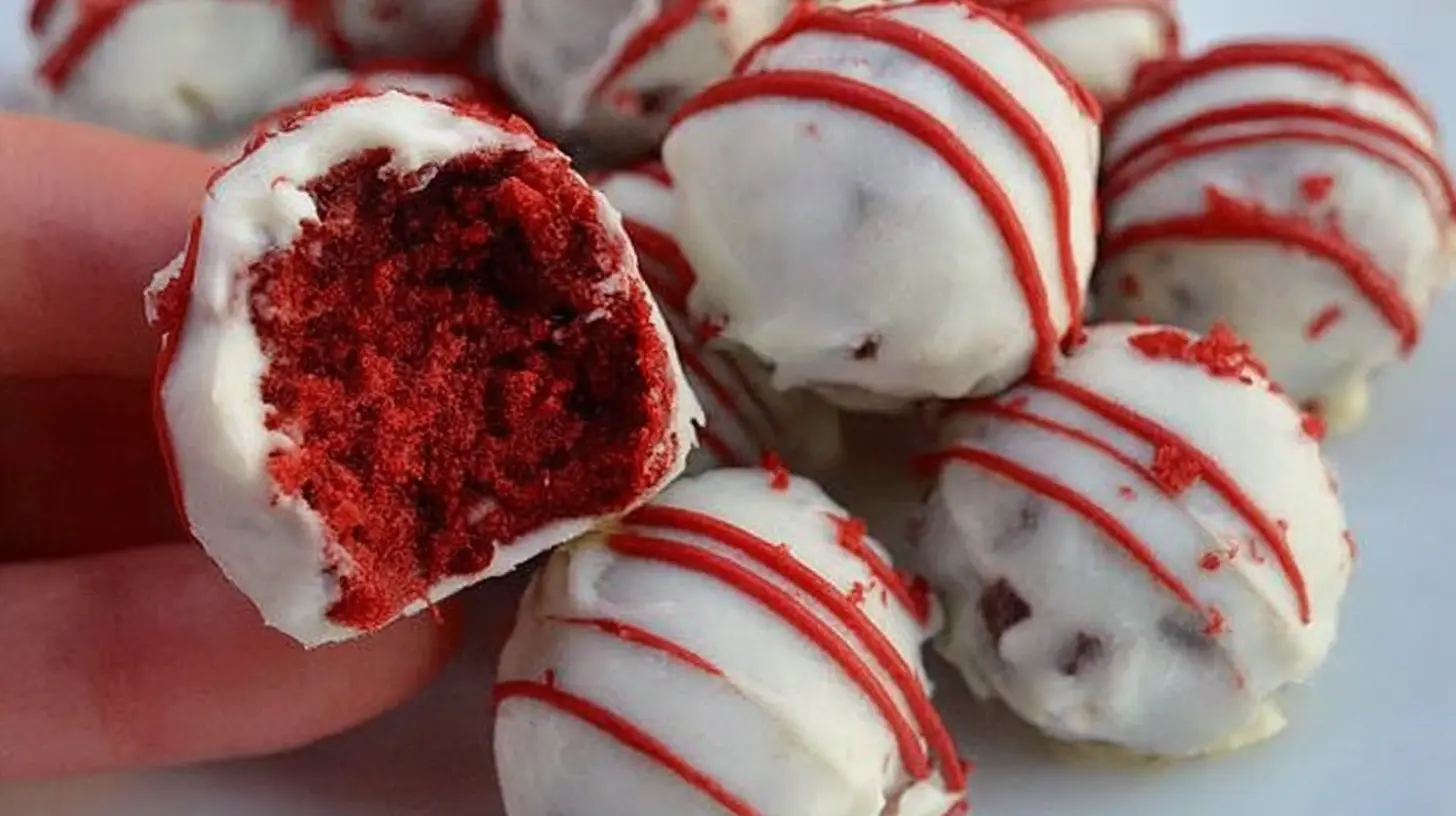
Decadent Dark Chocolate Cheesecake Truffles
Equipment
- electric mixer
- medium bowl
- baking sheet
- parchment paper
Ingredients
Truffle Base
- 8 ounces full-fat cream cheese softened
- 1/2 cup powdered sugar
- 1 teaspoon vanilla extract
- 1 cup finely crushed Oreo cookies for the base
Coating
- 10 ounces dark chocolate chips or baking bar, melted
- White chocolate optional, for drizzling
Instructions
Preparation
- In a medium bowl, beat the softened cream cheese with an electric mixer until it is smooth and creamy.
- Gradually add the powdered sugar and mix until fully incorporated with no lumps, then stir in the vanilla extract.
- Fold in the finely crushed Oreo cookies until they are just combined with the cream cheese mixture.
Shaping and Chilling
- Cover the bowl and refrigerate for at least 30 minutes, or until the mixture is firm enough to roll.
- Line a baking sheet with parchment paper, then scoop out a tablespoon of the mixture and roll it into a smooth ball. Place the truffles on the prepared baking sheet.
- Refrigerate the truffles for another 15-20 minutes while you prepare the coatings.
Coating
- Melt the dark chocolate according to package directions, then dip each chilled truffle into the melted chocolate, allowing excess to drip off, and return to the baking sheet.
- If desired, melt a small amount of white chocolate and drizzle it over the set dark chocolate truffles for decoration.
- Return the truffles to the refrigerator for at least 30 minutes, or until the chocolate coating is completely set.