
I remember the first time I heard about Fruity Pebbles Cheesecake Tacos – my eyes practically popped out of my head! The idea of combining that nostalgic, vibrant cereal with creamy cheesecake, all wrapped up in a fun, handheld dessert, felt like pure genius. It’s not just a dessert; it’s an experience, a miniature carnival for your taste buds that practically guarantees smiles.
Why This Dessert Is an Absolute Must-Try
There are desserts, and then there are experiences. Fruity Pebbles Cheesecake Tacos definitely fall into the latter category. What makes them so utterly irresistible and a dish you simply have to try?
Firstly, it’s the nostalgia factor. Fruity Pebbles cereal instantly transports many of us back to childhood mornings, making this dessert a playful, comforting throwback. Then, there’s the texture party – you get the delightful crunch of the cereal-coated “taco shell,” followed by the smooth, rich, and tangy cheesecake filling. And visually? They are an absolute showstopper. The vibrant colors of the Fruity Pebbles make these tacos pop on any dessert table, sparking conversation and excitement. They’re also incredibly versatile; whether you’re looking for a fun treat for a birthday party, a unique potluck contribution, or just a whimsical dessert for a cozy night in, these tacos fit the bill perfectly. Plus, they’re surprisingly easy to make, making them accessible even for novice bakers who want to impress.
> “I made these for a family gathering, and they disappeared faster than anything else! Everyone, from the kids to my grandparents, adored them. The crunch, the creaminess, the colors – pure dessert magic!” – A Happy Home Baker
The Journey to Delicious Fruity Pebbles Cheesecake Tacos
Making these delightful tacos is a fun and relatively straightforward process. You’ll essentially be creating a “taco shell” from a sweet base, crafting a luscious cheesecake filling, and then bringing them together with that iconic Fruity Pebbles crunch. The general flow involves preparing your shells (often by baking or briefly frying a tortilla-like base), whipping up a simple no-bake cheesecake, filling your cooled shells, and finally, coating them generously with crushed Fruity Pebbles for that signature look and texture.
What You’ll Need
Gathering your ingredients is the first step towards creating these vibrant treats. Here’s a typical checklist of what you’ll need, though specific variations might call for slight adjustments:
- For the “Taco Shells”:
- Flour tortillas (small street-taco size works best)
- Butter (melted)
- Granulated sugar
- Cinnamon (optional, for a churro-like shell)
- For the Cheesecake Filling:
- Cream cheese (full-fat, softened)
- Powdered sugar (confectioners’ sugar)
- Heavy whipping cream or cool whip
- Vanilla extract
- For the Coating:
- Fruity Pebbles cereal (crushed)
- White chocolate (melted, for a “glue” layer or drizzle)
Directions to Follow
Let’s break down how to bring these amazing Fruity Pebbles Cheesecake Tacos to life. While there are 7 wonderful recipes out there, this general guide covers the core steps to success:
- Prepare the Taco Shells: Preheat your oven to a moderate temperature (around 375°F/190°C). Brush both sides of your small flour tortillas with melted butter, then sprinkle generously with sugar (and cinnamon, if using). Drape each tortilla over two bars of an oven rack, creating a “V” shape, or use a taco stand. Bake for about 8-12 minutes, or until golden brown and crispy, checking frequently to prevent burning. Let them cool completely; they’ll crisp up further as they cool.
- Make the Cheesecake Filling: In a large bowl, beat the softened cream cheese with powdered sugar until smooth and creamy. Add the vanilla extract. In a separate bowl, whip the heavy cream until stiff peaks form (or gently fold in Cool Whip). Fold the whipped cream into the cream cheese mixture until just combined and fluffy. Be careful not to overmix.
- Crush the Fruity Pebbles: Pour a good amount of Fruity Pebbles into a shallow dish or a Ziploc bag. Lightly crush them with your hands or a rolling pin until you have a mix of finer crumbs and some larger pieces for texture.
- Assemble the Tacos: Melt your white chocolate in a microwave-safe bowl in 30-second intervals, stirring until smooth.
- Dip and Coat: Take a cooled, crispy taco shell. Carefully dip the top edge of the shell into the melted white chocolate, allowing any excess to drip off. Immediately press the chocolate-dipped edge into the crushed Fruity Pebbles, coating it thoroughly. Repeat for all shells and let the chocolate set slightly (you can pop them in the fridge for a few minutes to speed this up).
- Fill the Tacos: Once the chocolate and cereal coating is set, gently spoon or pipe (using a pastry bag or a Ziploc bag with a corner snipped) the cheesecake filling into each taco shell.
- Chill and Serve: Place the filled Fruity Pebbles Cheesecake Tacos on a plate and refrigerate for at least 30 minutes to an hour to allow the filling to set further and the flavors to meld.
Best Ways to Enjoy Them
These tacos are fantastic on their own, but a little creative presentation and pairing can elevate the experience even further!
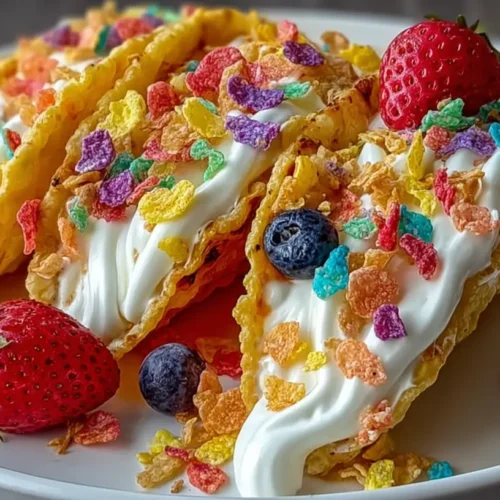
- Colorful Platter: Arrange them on a white platter to really make the vibrant colors pop.
- Fruit Garnish: A few fresh berries (strawberries, blueberries) or a sprig of mint can add a fresh contrast and a touch of elegance.
- Drizzle Fun: A light drizzle of extra white chocolate, a raspberry coulis, or even a citrus glaze can add another layer of flavor and visual appeal.
- Mini Dessert Bar: Offer them alongside other mini desserts for a fun party spread.
- Coffee or Milk Pairings: A cold glass of milk (to embrace the cereal vibe!) or a freshly brewed coffee makes for a delightful pairing.
Keeping Leftovers Fresh
While these delicious tacos are best enjoyed fresh for maximum crunch, you can certainly store any leftovers.
- Storage: Place the Fruity Pebbles Cheesecake Tacos in an airtight container in a single layer to prevent them from getting soggy or losing their shape. You can also place parchment paper between layers if stacking. Store them in the refrigerator for up to 2-3 days.
- Reheating: These are designed to be enjoyed chilled, so no reheating is necessary or recommended. Reheating would melt the filling and make the shells soft.
- Freezing: Freezing is generally not recommended for the assembled tacos, as the shells can become soggy once thawed, and the texture of the cheesecake filling might change. If you want to prep ahead, you can make and freeze the cheesecake filling separately in an airtight container for up to a month. Thaw it in the refrigerator overnight before filling your freshly made shells.
Pro Chef Tips for Success
Want to make your Fruity Pebbles Cheesecake Tacos truly shine? Here are a few insider tips:
- Crispy Shells are Key: Don’t underbake your tortilla shells! They need to be truly crispy when they come out of the oven to hold up to the filling and maintain that satisfying crunch. If they feel soft after cooling, pop them back in for a few more minutes.
- Soften Cream Cheese Properly: For a super smooth, lump-free cheesecake filling, ensure your cream cheese is at room temperature. Take it out of the fridge at least an hour before you plan to mix.
- Don’t Overmix the Filling: Once you fold in the whipped cream, stop mixing as soon as it’s combined. Overmixing can deflate the cream and lead to a less airy filling.
- Chill Time is Your Friend: Give the filled tacos enough time in the fridge. This not only helps the filling set but also allows the flavors to meld beautifully.
- Freshly Crushed Cereal: While you can crush the cereal ahead, coating just before serving or just before the final chill will give you the freshest, most vibrant cereal coating.
- “Glue” for the Pebbles: White chocolate isn’t just for flavor; it’s the perfect “glue” to make the Fruity Pebbles stick well to the taco shell, creating a beautiful, consistent coating.
Creative Twists
The beauty of Fruity Pebbles Cheesecake Tacos is how easily they can be adapted to different tastes and occasions.
- Cereal Swap: Why stop at Fruity Pebbles? Try Cinnamon Toast Crunch, Lucky Charms, or even Cocoa Puffs for different flavor profiles and colors.
- Flavor Boost to the Filling: Add a pinch of lemon zest, a tablespoon of fruit puree (like raspberry or strawberry), or a touch of almond extract to your cheesecake filling for an extra layer of flavor.
- Chocolate Shells: Dip the entire crispy tortilla shell in melted dark or milk chocolate before rolling in Fruity Pebbles for an even more decadent experience.
- Mini Version: Use smaller street-taco-sized tortillas for adorable, bite-sized dessert tacos perfect for parties.
- Nut Butter Swirl: Swirl a tablespoon of peanut butter or almond butter into a portion of your cheesecake filling for a nutty twist.
Your Questions Answered
Can I make the “taco shells” ahead of time?
A: Yes, you can! Bake and cool the tortilla shells up to 1-2 days in advance. Store them in an airtight container at room temperature. They might lose a tiny bit of crispness over time, but they’ll still be perfectly functional.
My cheesecake filling seems too runny. What went wrong?
A: This usually happens if your cream cheese wasn’t soft enough, or if you didn’t whip your heavy cream to stiff peaks. If it’s a little runny, try chilling the mixture for 15-20 minutes, then giving it another whisk. Ensure you’re using full-fat cream cheese for the best consistency.
Can I use corn tortillas instead of flour?
A: While technically possible, flour tortillas generally work better for this dessert. Corn tortillas can sometimes have a stronger flavor that might clash with the sweet profile, and they tend to get a bit tougher when baked this way. Flour tortillas also provide a more neutral base for the sugar and cinnamon.
Fruity Pebbles Cheesecake Tacos
Equipment
- Microwave
- Oven rack or taco shell molds
- Parchment-lined baking sheet
- Microwave-safe bowl
- Shallow dish
- Large bowl
- Hand mixer
- Separate chilled bowl
- Spoon or piping bag
Ingredients
For the Fruity Pebbles Taco Shells:
- 4-6 count 8-inch flour tortillas (or specialty dessert taco shells)
- 1 cup White chocolate chips or melting wafers
- 1 tsp Coconut oil or shortening (optional, for thinning chocolate)
- 2-3 cups Fruity Pebbles cereal
For the Cheesecake Filling:
- 16 oz Cream cheese, softened two 8-oz blocks
- 1 cup Powdered sugar (confectioners’ sugar)
- 1 teaspoon Vanilla extract
- 1/2 cup Heavy cream or 1 container [8 oz] Cool Whip, thawed
For garnish:
- 1/2 cup Additional Fruity Pebbles
Instructions
Prepare Taco Shells
- Warm tortillas in a microwave for 10-15 seconds to make them pliable, then drape them over an oven rack or taco shell molds to cool and firm up. For crispier shells, bake them lightly at 350°F for 5-7 minutes.
Melt Chocolate
- Melt white chocolate chips in a microwave-safe bowl in 30-second intervals until smooth; thin with coconut oil or shortening if needed.
Coat Shells
- Dip the top edge of each cooled taco shell into the melted white chocolate, then immediately dip into Fruity Pebbles, pressing gently to adhere the cereal. Refrigerate on a parchment-lined baking sheet for 10-15 minutes until chocolate is set.
Make Cheesecake Filling
- Beat softened cream cheese until smooth, then add powdered sugar and vanilla extract, beating until well combined.
Whip Cream
- In a separate chilled bowl, beat heavy cream until stiff peaks form, then gently fold into the cream cheese mixture until just combined.
Assemble Tacos
- Spoon or pipe the cheesecake filling into each Fruity Pebbles-coated taco shell.
Garnish
- Sprinkle additional Fruity Pebbles over the top of the filling for extra crunch and color.
Chill
- Refrigerate the assembled tacos for at least 30 minutes to allow the filling to set and flavors to meld.