
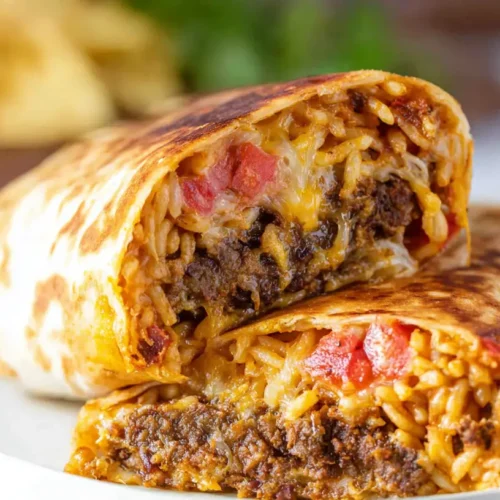
The aroma of a perfectly crisped quesadilla combined with the savory heartiness of a burrito—that’s the dream, right? I’ve always been a huge fan of creative fusion in the kitchen, and the Grilled Cheese Burrito quickly became a personal obsession. There’s something inherently comforting about melty cheese and warm tortillas, but when you elevate it with that irresistible golden-brown crunch, it’s truly a game-changer. This isn’t just another quick meal; it’s an experience, a delightful mash-up that delivers on flavor and texture in ways you wouldn’t expect.
Reasons to Try It
Why settle for a plain grilled cheese or a run-of-the-mill burrito when you can have the best of both worlds? This Grilled Cheese Burrito offers an incredible textural contrast—a crispy, cheesy exterior giving way to a warm, flavor-packed interior. It’s remarkably quick to whip up, making it ideal for those busy weeknights when you’re craving something satisfying but don’t have hours to spend in the kitchen. Plus, it’s incredibly versatile; you can customize the fillings to suit any palate, from picky eaters to adventurous foodies. It’s comfort food redefined, and trust me, once you try it, you’ll wonder how you ever lived without it.
> “I was skeptical at first, but this Grilled Cheese Burrito recipe is genius! The crispy cheese on the outside adds so much flavor and texture. My family devoured them!” – A Happy Home Cook
How This Recipe Comes Together
Crafting the ultimate Grilled Cheese Burrito is simpler than you might think, especially when you know the secrets. The process starts by preparing your fillings—cooking any meats or veggies and shredding your cheese. Then, you’ll layer a tortilla with cheese directly on your cooking surface, allowing it to crisp up slightly before adding your main burrito fillings. The key is in how you fold and then “grill” the entire package, using that initial cheesy layer to create a perfectly golden, crunchy exterior that encases all the deliciousness within. It’s a method that ensures every bite delivers that satisfying crunch alongside warm, savory fillings.
Key Ingredients
To embark on your Grilled Cheese Burrito journey, gather these essential items:
- Large Flour Tortillas: Opt for burrito-sized (10-12 inches) to ensure you have enough surface area for folding and filling.
- Shredded Cheese: A good melting cheese is crucial. Cheddar, Monterey Jack, Colby, or a Mexican blend all work wonderfully. Don’t be shy with the cheese—it’s half the magic!
- Cooked Seasoned Ground Beef or Chicken: (Optional, but highly recommended for a hearty meal). Season well with taco seasoning, cumin, chili powder, or whatever spices you love for your tacos/burritos.
- Cooked Rice: Plain white or brown rice, or a flavored Spanish rice.
- Canned Black Beans: Rinsed and drained.
- Salsa or Picante Sauce: Your favorite level of heat and chunkiness.
- Sour Cream or Greek Yogurt: For a creamy element.
- Oil or Butter: For grilling the tortilla to perfection.
- Optional Fillings: Diced onions, bell peppers, corn, jalapeños, cilantro, avocado slices, or guacamole.
Directions to Follow
Let’s make some magic!
- Prepare Your Fillings: If using meat, cook and season your ground beef or shred your cooked chicken. Heat the black beans and rice if they’re cold. Have all your desired fillings ready and within reach.
- Heat Your Pan: Place a large non-stick skillet or griddle over medium heat. Add a tiny drizzle of oil or a pat of butter, ensuring it’s evenly coated.
- The First Secret: The Cheese Base: Lay a large flour tortilla flat in the hot pan. Immediately sprinkle a generous layer of shredded cheese (about 1/4 to 1/2 cup) directly onto one half of the tortilla, leaving the other half mostly bare. Let this cheese melt and start to get golden and crispy, forming a cohesive cheesy layer underneath the tortilla. This is our first secret for that incredible exterior crunch!
- Assemble the Burrito: Once the cheese has a nice, crispy crust underneath the tortilla (this takes 1-2 minutes), quickly add your fillings. Spoon your cooked meat (if using), rice, beans, salsa, and a dollop of sour cream onto the bare side of the tortilla, right in the center. Avoid overfilling, or it will be hard to fold.
- Fold and Seal: Carefully fold the cheesy side of the tortilla over the fillings. Press down gently with a spatula.
- The Second Secret: The Final Grill: Now, gently flip the entire burrito over so the folded, cheesy side is now face down on the pan. Let it cook for another 2-3 minutes, pressing occasionally with your spatula, until that side is beautifully golden brown and crispy. Repeat this on the other side if desired, until both sides are perfectly toasted and the cheese inside is fully melted. This double-grill ensures maximum crispiness and melty goodness.
- Serve Immediately: Remove from the pan, slice in half if desired, and enjoy!
Best Ways to Enjoy It
The Grilled Cheese Burrito is a meal in itself, but it certainly welcomes some companions. Serve it alongside a fresh green salad with a zesty vinaigrette to cut through the richness. A side of extra salsa, guacamole, or a dollop of fresh sour cream always goes well. For a truly satisfying experience, add a bowl of warm tortilla soup or some crispy tortilla chips. Don’t forget a refreshing squeeze of lime juice over the top before serving to brighten all the flavors!
Keeping Leftovers Fresh
While these are truly best enjoyed fresh off the griddle, you can store any leftovers. Allow the burrito to cool completely, then wrap it tightly in plastic wrap or aluminum foil. Store in an airtight container in the refrigerator for up to 2-3 days. To reheat, I recommend using a toaster oven or even a dry skillet on medium-low heat. This will help restore some of that lovely crispness to the tortilla. The microwave will heat it through, but you’ll likely lose the crispy texture. Freezing is not recommended as the texture of the tortilla and some fillings can become mushy upon thawing and reheating.
Pro Chef Tips
- Don’t Skimp on the Cheese Base: That first layer of cheese sprayed directly on the pan is essential for the signature crispy crust. Use a good amount, let it melt, and get slightly bubbly and golden before adding fillings.
- Even Heat is Key: Make sure your pan is heated evenly before you start. A medium heat works best to allow the cheese to crisp without burning and to heat the fillings through.
- Don’t Overfill: It’s tempting, but too many fillings will make the burrito impossible to fold properly and difficult to grill evenly. Stick to modest, well-distributed layers.
- Press Gently: When grilling the burrito, gently press down with a spatula. This ensures maximum contact with the hot pan, promoting even browning and crisping.
- Pre-Warm Fillings: If your fillings (like rice and beans) are cold, briefly warm them before assembling the burrito. This helps ensure the entire burrito is hot throughout without over-grilling the tortilla.
Creative Twists
- Breakfast Burrito Style: Scramble some eggs with cheese, add cooked sausage or bacon, and a dollop of hot sauce for a savory morning treat.
- Veggie Loaded: Pack it with sautéed peppers and onions, corn, mushrooms, and spinach for a vibrant vegetarian option.
- Buffalo Chicken: Use shredded cooked chicken tossed in buffalo sauce, with a sprinkle of blue cheese crumbles for a spicy kick.
- Pork Carnitas: Leftover carnitas or pulled pork makes an incredible filling.
- Spicy Kick: Add some diced jalapeños (fresh or pickled) to your fillings, or a drizzle of sriracha mayo on top.
- Different Cheeses: Experiment with pepper jack for heat, smoked gouda for depth, or a blend of provolone and mozzarella for a milder, stretchier cheese pull.
Common questions
How do I prevent my Grilled Cheese Burrito from becoming soggy?
The key is to manage the moisture of your fillings. Ensure any cooked meats or veggies are well-drained. Also, don’t add very watery ingredients like large amounts of fresh tomatoes directly into the burrito. The initial crispy cheese layer and the final grilling process are designed to create a barrier and a crisp exterior, minimizing sogginess. Using a non-stick pan with a little oil or butter also helps create that desirable crust.
Can I make this gluten-free?
Absolutely! Simply swap the large flour tortillas for your favorite gluten-free large tortillas. Ensure that all your other ingredients, especially seasoning blends, are certified gluten-free. The cooking method remains exactly the same.
What’s the best cheese for the crispy exterior?
A medium-firm cheese with good melting properties works best. Shredded cheddar, Monterey Jack, Colby, or a Mexican blend are excellent choices. Avoid cheeses that release too much oil (like some pre-shredded mozzarella) or cheeses that don’t melt well and stay crumbly. The goal is a uniform, bubbly, golden-brown crust.
Spicy Chorizo & Potato Grilled Cheese Burrito
Equipment
- Medium skillet
- Slotted spoon
- Large non-stick skillet or griddle
- Spatula
Ingredients
Burrito
- 2 burrito-sized Large Flour Tortillas
- 1 1/4 cup Cheese shredded Monterey Jack or Mexican Blend
Filling
- 2 tablespoons Butter or Mayonnaise
- 4 oz Chorizo removed from casing and crumbled
- 1 small Potato peeled and finely diced
- 1/4 small Onion finely diced
- 1/2 Jalapeño seeded and minced
- Optional Seasonings Pinch of salt, black pepper, and smoked paprika
Instructions
Chorizo & Potato Filling
- Cook crumbled chorizo in a medium skillet until browned, then remove with a slotted spoon, leaving about 1 tablespoon of fat in the pan.
- Add diced potato, onion, and minced jalapeño to the skillet and cook for 8-10 minutes, until tender and lightly browned, stirring occasionally. Season with salt, pepper, and smoked paprika, then stir the cooked chorizo back in.
Assemble Burritos
- Lay a large flour tortilla flat and sprinkle about 1/2 cup of shredded cheese down the center.
- Place half of the chorizo and potato filling over the cheese, then sprinkle another 1/4 cup of cheese on top.
- Fold the short sides of the tortilla inward, then tightly roll it to create a snug, sealed burrito. Repeat for the second burrito.
Grill Burritos
- Heat a large non-stick skillet over medium heat, then spread butter or mayonnaise on one side of a separate large flour tortilla.
- Place the buttered tortilla butter-side down in the hot pan and immediately sprinkle about 2 tablespoons of cheese over it.
- Carefully place one assembled burrito on top of the cheesy tortilla in the pan, then spread butter or mayonnaise on the exposed side of the outer tortilla.
- Cook for 3-5 minutes until the bottom is golden brown and crispy; then, carefully flip and cook for another 3-5 minutes until the other side is golden brown and crispy.
- Transfer to a cutting board, slice in half if desired, and serve immediately. Repeat for the second burrito.