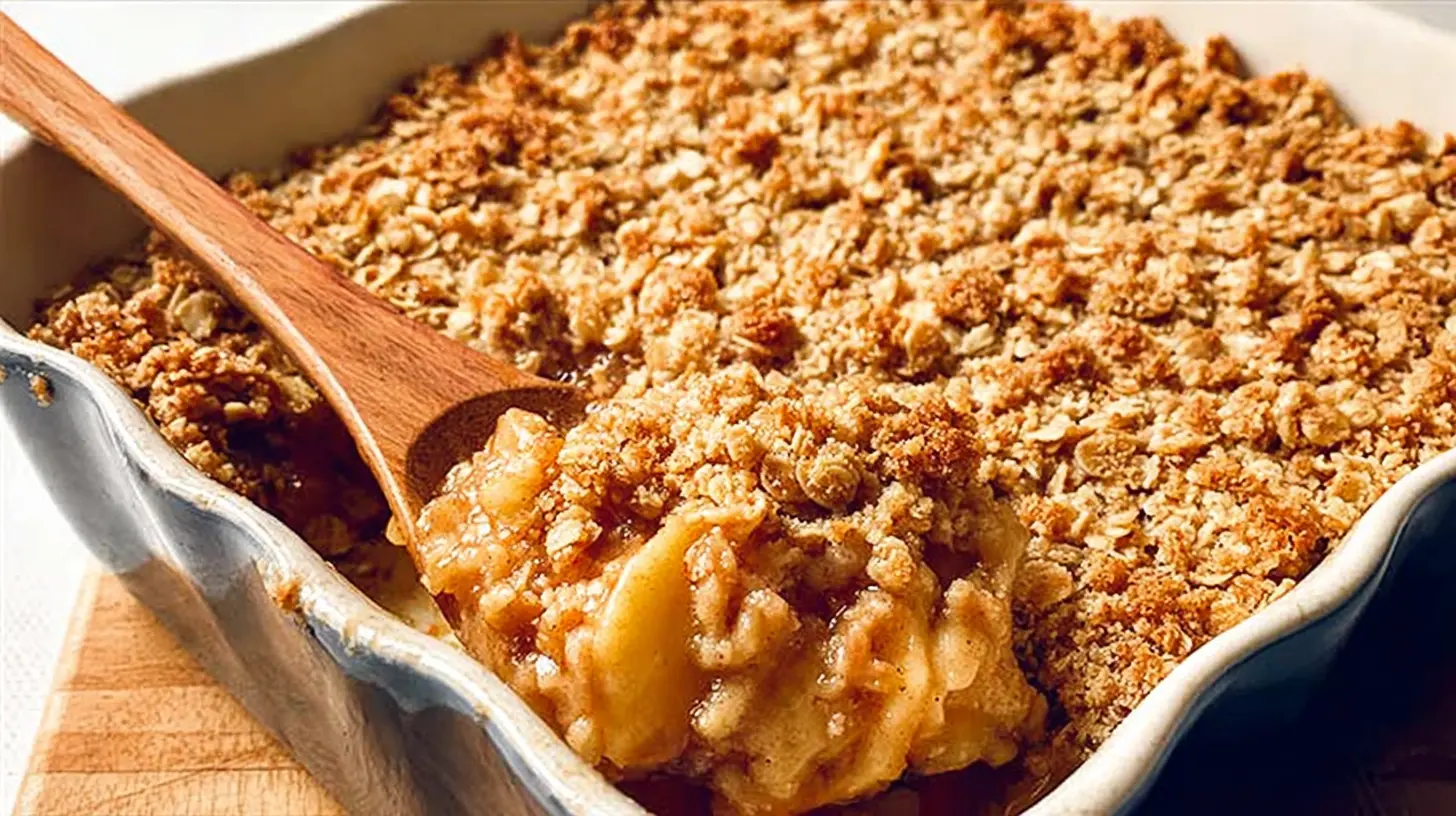
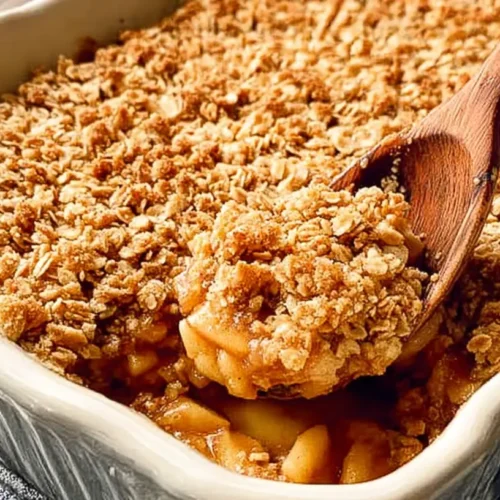
The aroma of warm, spiced apples bubbling beneath a crunchy oat topping always reminds me of cozy autumn afternoons and family gatherings. There’s just something inherently comforting about an apple crisp, and while it might seem like a dessert reserved for special occasions, I’m here to tell you it absolutely doesn’t have to be. In fact, many home bakers have perfected the art of whipping up an incredible apple crisp with surprising ease, and I’ve gathered some of their best insights to share with you.
Reasons to Give This Dish a Try
If you’re anything like me, you appreciate a dessert that delivers maximum flavor with minimal fuss. This Easy Apple Crisp Dessert hits all those sweet spots. It’s the kind of dish that smells incredible as it bakes, tastes even better warm from the oven, and disappears quickly from any table. What makes this recipe particularly special is its flexibility. It’s forgiving enough for beginner bakers, yet satisfying enough for seasoned pros. Plus, it’s a fantastic way to use up a bounty of apples, whether they’re from an orchard visit or just a good sale at the grocery store. It’s perfect for a weeknight treat, a casual brunch addition, or a comforting end to a family meal.
> “I used to think apple crisp was complicated, but this approach changed my mind! So simple, and the results are always a crowd-pleaser.” – A Happy Home Baker
How This Easy Apple Crisp Comes Together
The beauty of a truly easy apple crisp lies in its straightforward approach. We’re talking about a simple two-part process: preparing the apple filling and then mixing up the crumble topping. The apples get a quick toss with spices and a touch of sweetness, then nestled into a baking dish. The topping, a delightful mix of oats, flour, sugar, butter, and often a pinch of cinnamon, comes together in minutes and is sprinkled generously over the fruit. A short stint in the oven transforms these humble ingredients into a golden, bubbly, aromatic dessert that will have everyone asking for seconds.
What You’ll Need
Gathering your ingredients is the first step to any successful bake. For this delightful apple crisp, you’ll need:
- Apples: About 6 medium-sized apples (a mix of sweet and tart like Honeycrisp, Gala, Fuji, or Granny Smith works wonderfully)
- Granulated Sugar: For sweetness in the filling.
- Brown Sugar: Adds a deeper, caramel-like flavor to both the filling and topping.
- All-Purpose Flour: A little for the filling to thicken the juices, more for the topping.
- Old-Fashioned Rolled Oats: Essential for that signature crisp topping texture. (Quick oats can be used in a pinch, but rolled oats offer better chew.)
- Unsalted Butter: Cold and cubed for the topping, or melted for convenience depending on the method.
- Ground Cinnamon: The classic spice pairing for apples.
- Nutmeg (optional): A warm, aromatic addition.
- Lemon Juice (optional): A squeeze can brighten the apple flavor and prevent browning.
- A pinch of Salt: Balances the sweetness in both layers.
Clear Directions to Follow
Let’s get this deliciousness baked! Here’s a user-friendly guide:
- Preheat Oven & Prep Dish: Start by preheating your oven to 375°F (190°C). Lightly grease an 8×8 or 9×9 inch baking dish with butter or cooking spray.
- Prepare the Apples: Peel, core, and slice your apples into roughly ½-inch thick pieces. Place them in a large bowl.
- Season the Apples: Add 2 tablespoons of granulated sugar, 1 tablespoon of all-purpose flour, 1 teaspoon of ground cinnamon, and an optional squeeze of lemon juice to the apples. Toss gently until the apples are evenly coated.
- Transfer to Dish: Pour the apple mixture into your prepared baking dish, spreading it out evenly.
- Make the Topping: In the same bowl (no need to wash!), combine ½ cup all-purpose flour, ½ cup old-fashioned rolled oats, ¼ cup granulated sugar, ¼ cup packed light brown sugar, ½ teaspoon ground cinnamon, and a tiny pinch of salt.
- Add Butter to Topping: Cut a ½ cup (1 stick) of cold unsalted butter into small pieces. Add them to the dry topping ingredients. Using your fingertips or a pastry blender, work the butter into the mixture until it resembles coarse crumbs.
- Assemble & Bake: Sprinkle the crumble topping evenly over the spiced apples in the baking dish.
- Bake: Place the dish in the preheated oven and bake for 35-45 minutes, or until the topping is golden brown and the apple filling is bubbly and tender when poked with a fork.
- Cool Slightly: Remove from the oven and let it cool for at least 15-20 minutes before serving. This allows the filling to set slightly.
Best Ways to Enjoy Your Apple Crisp
While a warm Apple Crisp fresh from the oven is a treat in itself, there are many wonderful ways to elevate the experience. My absolute favorite is a scoop of good quality vanilla bean ice cream melting over the warm crisp – the contrast in temperatures and textures is divine! You could also drizzle it with a touch of homemade caramel sauce for extra indulgence. For a slightly lighter touch, a dollop of freshly whipped cream is always a good idea. And honestly, a simple bowl served plain with a cup of coffee or tea is equally satisfying. Don’t be afraid to experiment with your favorite toppings!
Keeping Leftovers Fresh
Storing your apple crisp properly ensures you can enjoy it for a few days. Once it has cooled completely, cover the baking dish tightly with plastic wrap or aluminum foil. It can be stored at room temperature for up to 2 days, though I personally prefer to refrigerate it if you plan to keep it longer.
Refrigeration: Store in an airtight container or covered baking dish in the refrigerator for up to 4-5 days.
Reheating: To reheat individual servings, a quick zap in the microwave works perfectly. For a larger portion or if you want to crisp up the topping again, place it in a preheated oven (350°F/175°C) for about 10-15 minutes, or until warmed through and the topping is crunchy.
Freezing: While you can freeze apple crisp, the topping can sometimes lose a bit of its crispness when thawed. If you choose to freeze, bake it completely, let it cool, then wrap it tightly in plastic wrap and then foil. It can be frozen for up to 3 months. Thaw in the refrigerator overnight and reheat as above.
Practical Cooking Tips
Even with an “easy” recipe, a few insider tips can make your apple crisp even better:
- Don’t Overmix the Topping: When combining the butter with the dry ingredients for the crumble, work it just until it forms coarse crumbs. Overmixing can lead to a tougher topping.
- Balance Your Apples: Using a mix of sweet and tart apples provides the best depth of flavor. The tartness cuts through the sweetness, creating a more dynamic dessert.
- Don’t Skimp on Spice: While cinnamon is classic, a pinch of nutmeg or allspice can add lovely complexity to the apple filling.
- Pre-Cook Apples (Optional): If you prefer your apples very soft, or if you’re using very firm apple varieties, you can lightly sauté them for 5-7 minutes before adding them to the baking dish. This helps them soften evenly during baking.
- Prevent a Soggy Bottom: Adding a spoonful of flour to the apple filling helps absorb excess moisture and prevents the bottom of your crisp from getting too watery.
Creative Twists for Your Crisp
Once you’ve mastered the basic easy apple crisp, feel free to get creative!
- Add Nuts: Toasted pecans, walnuts, or almonds can be added to the topping for extra crunch and flavor.
- Berry Boost: Mix in a handful of fresh or frozen berries (like raspberries or blueberries) with the apples for a fruitier twist.
- Different Spices: Experiment with cardamom, ginger, or even a touch of pumpkin pie spice blend for different aromatic profiles.
- Citrus Zest: A bit of lemon or orange zest in the apple filling can brighten the flavors.
- Gluten-Free Version: Substitute the all-purpose flour in both the filling and topping with a gluten-free all-purpose flour blend and ensure your oats are certified gluten-free.
- Vegan Option: Use plant-based butter (like a good quality vegan stick butter) and ensure all other ingredients are vegan.
Your Questions Answered
What kind of apples are best for apple crisp?
A: A mix of sweet and tart apples is often ideal for a balanced flavor. Good choices include Honeycrisp, Fuji, Gala (sweeter), and Granny Smith, Braeburn, or Pink Lady (tart). Using a combination gives you the best of both worlds in terms of texture and taste.
Can I make the apple crisp ahead of time?
A: You can certainly do some prep ahead! You can peel and slice the apples up to a day in advance, tossing them with a little lemon juice to prevent browning, and store them in an airtight container in the fridge. The topping mixture can also be made ahead and stored in the refrigerator for a few days. Assemble and bake just before you plan to serve for the freshest, crispiest result.
My crisp topping isn’t crunchy. What went wrong?
A: There are a few culprits for a less-than-crispy topping. Ensure your butter is cold when you cut it into the dry ingredients. Also, make sure you don’t overmix the topping, which can make it dense. Finally, baking for the full recommended time (or even a little longer if needed) at the correct temperature is key. The topping should be deeply golden brown. If your apples are bubbling but the top isn’t crisp, try moving the dish to the upper rack of your oven for the last 5-10 minutes.
Easy 2-Ingredient Apple Crisp Dessert
Equipment
- Oven
- Baking Dish (8×8 or 9×9 inch)
- Vegetable Peeler
- Apple Corer (optional)
- Knife
- Cutting Board
Ingredients
Main Ingredients
- 4-6 medium apples Honeycrisp, Fuji, Gala, or Granny Smith recommended
- 1 packet dry oatmeal cookie mix 17.5 oz
Optional Enhancements
- butter for greasing
- cinnamon or nutmeg pinch
- lemon juice splash
Instructions
Preparation
- Preheat your oven to 375°F (190°C) and lightly grease an 8×8 or 9×9 inch baking dish with butter or cooking spray.
- Wash, peel, core, and slice the apples into 1/4-inch thick pieces, aiming for about 4-5 cups of sliced apples.
- Spread the sliced apples evenly in the prepared baking dish and, if desired, sprinkle with cinnamon/nutmeg or drizzle with lemon juice.
Baking
- Evenly sprinkle the entire dry contents of the oatmeal cookie mix over the apples, without adding any liquids or fats.
- Bake for 30-40 minutes, or until the apples are fork-tender and the topping is golden brown and bubbly; if the topping browns too quickly, loosely tent with aluminum foil.
Serving
- Remove from the oven and let cool for 10-15 minutes before serving.