
It all started with a struggle familiar to many parents: the daily lunchbox dilemma. My kids, bless their hearts, seemed to have an innate talent for bringing home uneaten sandwiches and squished fruit. I cycled through countless containers, tried every “fun” food idea, and still, the lunch bags often returned with more than they left with. That’s when I stumbled upon the bento box concept for kids, and honestly, it felt like discovering a secret weapon in the lunchtime wars. Suddenly, packing became less of a chore and more of a creative outlet, and more importantly, the lunches started coming home empty. If you’re tired of the same old lunch routine and looking for a way to inject some excitement and nutrition into your child’s midday meal, you’re in the right place.
Why you’ll love this dish
If you’re a parent, guardian, or caregiver, you’re likely always on the hunt for ways to make daily routines smoother, healthier, and perhaps even a little more fun. That’s precisely what Kids Lunch Boxes Bento bring to the table – or rather, to the lunch table! This isn’t just about packing food; it’s about transforming the entire lunchtime experience for both you and your child.
Here’s why embracing the bento box trend for your kids’ lunches is a game-changer:
- Picky Eater Paradise: My eldest was a notorious picky eater. Offering a variety of small portions in separate compartments encouraged her to try new things without feeling overwhelmed by a large serving. It’s like a buffet just for them!
- Nutritional Nirvana: With distinct sections, it’s incredibly easy to ensure a balanced meal. You can effortlessly include a protein, a grain, fruits, veggies, and even a healthy treat, covering all those essential food groups without them touching.
- Portion Control Perfection: Bento boxes naturally encourage appropriate portion sizes. This is brilliant for preventing food waste and teaching children about balanced eating without making it feel restrictive.
- Waste Reduction Champion: Say goodbye to endless plastic baggies! Most bento boxes are reusable, durable, and significantly cut down on single-use plastic, making them an eco-friendly choice you can feel good about.
- Time-Saving Superstar (Surprisingly!): While it might seem like more effort at first, a well-planned bento can be assembled quickly. Many components can be prepped on the weekend, making weekday mornings a breeze. Plus, the distinct compartments mean no more wrapping each item separately.
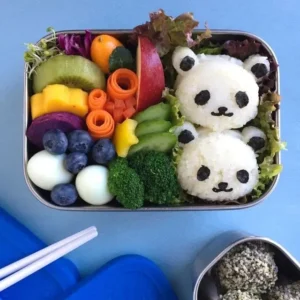
- Fun & Engaging: Let’s be honest, food just looks more appealing when it’s neatly arranged and colorful. Bento boxes turn lunch into an exciting unboxing experience, which can make even the most reluctant eaters more enthusiastic about their meal.
> “I used to dread packing lunches. My kids would barely touch them. Since switching to bento boxes, they actually eat everything! It’s amazing how much difference the presentation makes.” — A happy parent review
The cooking process explained
Creating a fantastic Kids Lunch Box Bento really isn’t “cooking” in the traditional sense; it’s more about thoughtful assembly and presentation. The beauty of the bento approach is its flexibility. You’re essentially curating a mini-meal, bringing together pre-made, cooked, or raw components into a visually appealing and balanced package. Think of it as painting with food, where your bento box is the canvas and each compartment holds a different color or texture. The key is variety, color, and ensuring each item is portioned just right for little hands and appetites. It’s about making healthy eating an exciting adventure rather than a chore.
What you’ll need
The beauty of Kids Lunch Boxes Bento is that you don’t necessarily need to cook elaborate meals. Often, it’s about artfully arranging components you already have or can quickly prepare.
- The Bento Box Itself: This is your foundation! Look for ones with multiple compartments (2-5 sections are usually ideal), a leak-proof seal, and durable material like stainless steel or BPA-free plastic. Different sizes cater to different appetites.
- Main Protein/Staple:
- Cooked chicken (shredded, diced, or mini drumsticks)
- Hard-boiled eggs
- Cheese cubes or slices
- Cooked pasta (plain or with a light sauce)
- Mini sandwiches or wraps (cut into fun shapes!)
- Edamame
- Yogurt (in a separate small, leak-proof container)
- Leftover meatballs or mini quiches
- Fruits:
- Berries (strawberries, blueberries, raspberries)
- Apple slices (tossed in lemon juice to prevent browning)
- Grape halves (for younger children, always cut these!)
- Mandarin orange segments
- Melon cubes
- Pear slices
- Vegetables:
- Cucumber slices or sticks
- Carrot sticks or “coins”
- Bell pepper strips (various colors for appeal!)
- Cherry tomatoes (halved for young children)
- Broccoli florets (lightly steamed or raw)
- Snap peas
- Healthy Snacks/Extras:
- Whole-grain crackers or pretzels
- Rice cakes (plain or with a fun topping)
- Trail mix (nut-free for school!)
- Dried fruit (raisins, cranberries)
- Small cookie cutters (for fun shapes!)
- Silicone cupcake liners (great for extra separation)
- Food picks/utensils (kid-friendly ones!)
- Small dipping containers (for hummus, yogurt dip, etc.)
A note on variety: The key is to have a good mix of textures, colors, and flavors. Think about a main item, a couple of veggies, a fruit, and a small snack or treat.
Directions to follow
Building a bento box for your child is less about following a rigid recipe and more about incorporating a few smart steps to ensure it’s balanced, appealing, and safe.
- Plan Ahead (Even a Little): Before you even open the fridge, quickly think about what components you want to include: a protein, a fruit, a veggie, and a grain/snack. This stops you from just grabbing whatever and ensures a balanced meal.
- Prep the Components: Many items can be prepped on the weekend or the night before. Wash and chop fruits and veggies, cook eggs, grill chicken, or bake muffins. Keep them in separate containers in the fridge.
- Choose Your Main Item: Start by placing the largest component into one of the main compartments. This might be a sandwich, a portion of pasta, or a small serving of last night’s dinner.
- Add Proteins: Fill another section with a good source of protein like cheese cubes, yogurt, hard-boiled eggs, or sliced deli meat (ensure it’s nitrate-free if possible).
- Incorporate Fruits & Veggies: This is where the color comes in! Fill smaller compartments or use silicone dividers to add a variety of colorful fruits and vegetables. Aim for at least two different options here.
- Include a Healthy Snack/Grain: Add whole-grain crackers, pretzels, a small handful of trail mix, or a homemade energy bite to round out the meal.
- Consider Dips: If your child loves dips (like hummus, yogurt dip, or a healthy dressing), pack them in tiny, leak-proof containers within the bento box. This encourages them to eat more veggies!
- Add Fun & Flair: This step is optional but makes a huge difference, especially for picky eaters. Use small cookie cutters for sandwiches or cheese, add some adorable food picks, or just arrange items neatly.
- Pack Smart & Secure: Ensure all lids are tightly closed. If packing anything that needs to stay cold (like yogurt or cheese), include an ice pack in the lunch bag.
- Taste Test (for Yourself!): Always consider what items might get soggy or lose appeal. Pack wet items separately if needed.
Best ways to enjoy it
The great thing about Kids Lunch Boxes Bento is that the “serving suggestion” is built right into the design: it’s a complete, portable meal! But beyond just opening the box, there are ways to maximize the enjoyment and benefit.
- Make it a Ritual: Encourage your child to open their bento box and appreciate the variety inside. Talk to them about what’s in their lunch and why it’s there.
- Pair with Hydration: Always include a reusable water bottle alongside the bento box. Hydration is key for active kids.
- Picnic Style: Even if they’re eating at school, the bento box naturally creates a mini picnic experience, making lunch feel more special than a brown-bagged sandwich.
- Encourage Independence: The segregated compartments allow children to easily choose what they want to eat first and manipulate different foods without them touching, fostering a sense of independence at mealtime.
- Post-Lunch Feedback: Ask your child what they liked best and what they didn’t touch. This feedback is invaluable for planning future bento boxes and understanding their evolving tastes. Sometimes, a simple change in cut or presentation can make all the difference.
Keeping leftovers fresh
One of the fantastic benefits of the bento box system is its focus on fresh, appealing food. However, proper storage is crucial, especially since these lunches are often packed hours before consumption.
- Refrigeration is Key: Always assemble your bento box the night before or the morning of, and immediately place it in the refrigerator. The goal is to keep perishable items (like dairy, cooked meats, and some fruits/vegetables) as cold as possible until lunchtime.
- Use an Insulated Bag & Ice Pack: For school or outings, a good insulated lunch bag with a quality ice pack is non-negotiable. This keeps the food at a safe temperature for several hours, preventing bacterial growth and maintaining freshness.
- Separate Wet and Dry: Even if your bento box has compartments, some items might release moisture. If you’re packing something like sliced tomatoes or juicy fruit alongside crackers, consider using a small silicone divider or a mini separate container for the wetter item to prevent sogginess.
- Prevent Browning: For fruits like apples or pears, a quick dip in a mixture of water and a squeeze of lemon juice (or even just plain lemon juice diluted) can significantly slow down oxidation and keep them looking fresh.
- Airtight is Right: Ensure your bento box has an airtight seal. This not only prevents leaks but also helps keep food fresher and prevents odors from mixing within the lunch bag.
- Reheating (If Applicable): For hot lunch items (like leftover pasta or soup packed in a thermose), teach your child or school staff the proper way to reheat, ensuring food reaches a safe internal temperature if not consumed within the safe “danger zone” window (usually 2 hours at room temperature).
Helpful cooking tips
While “cooking” for a bento box is mostly assembly, there are definitely some pro tips that make the process smoother, more efficient, and the end product more appealing and palatable for your little ones.
- Weekend Prep Power: Dedicate a short time on the weekend (or one evening) to prep bento components. Think chopping a big batch of veggies, washing fruit, batch-cooking some mini muffins, hard-boiling eggs, or grilling extra chicken. This makes weekday mornings infinitely easier.
- Go for Color! Kids eat with their eyes first. Aim for a rainbow of colors in each bento. Different colored bell peppers, berries, and carrot sticks automatically make the meal more inviting.
- Vary Textures: Include a mix of crunchy (crackers, raw veggies), soft (cheese, yogurt), and chewy (dried fruit, cooked pasta) items to keep things interesting for their palate.
- Size Matters: Cut foods into bite-sized pieces that are easy for young children to handle using a fork or their fingers. This is especially important for safety (e.g., grape halves, cherry tomato quarters).
- Sweet is Relative: Instead of added sugars, use naturally sweet elements like berries, melon, or roasted sweet potatoes to satisfy a sweet craving.
- Embrace Leftovers: Last night’s dinner can be today’s bento star! Small portions of pasta, grilled chicken, or even rice dishes can be reimagined in a bento.
- Don’t Forget the Dip: A small side of hummus, ranch, or yogurt dip can encourage children to eat more vegetables or even try new ones.
- Invest in Accessories: Silicone cupcake liners, mini cookie cutters for sandwiches, and fun food picks aren’t just for aesthetics; they help keep food separated and make lunch feel like a special treat.
- Think Themes: Occasionally, try a themed bento (e.g., “ocean” with fish crackers and blue jelly, or “garden” with veggie sticks and a flower-shaped sandwich). It adds an element of surprise and fun.
Creative twists
The wonderful world of Kids Lunch Boxes Bento is all about creativity! Once you’ve got the basic balanced approach down, don’t be afraid to experiment and add your own flair.
- Themed Lunches: This is a big hit! Think “Under the Sea” with goldfish crackers, blue Jell-O (lightly sweetened!), and cucumber “waves.” Or a “Garden Patch” with veggie sticks, flower-shaped sandwiches, and berry “bugs.”
- Mini Meal Explorations: Instead of just sandwiches, try mini pizzas on pita bread, deconstructed tacos (with separate compartments for tortillas, cooked meat, cheese, and salsa), or even mini skewers of cheese, fruit, and cooked chicken.
- Beyond the Sandwich:
- Pasta Salad: A cold pasta salad with cherry tomatoes, cucumber, cheese, and a light vinaigrette.
- Lunchable Style: DIY “Lunchables” with crackers, sliced cheese, and deli meat cut into fun shapes.
- Sushi Rolls: Use flattened bread or tortillas filled with cream cheese, avocado, or tuna, then rolled and sliced into “sushi” circles.
- Breakfast for Lunch: Mini pancakes or waffles with a small container of maple syrup for dipping, hard-boiled eggs, and fruit.
- Flavor Boosts: Introduce different spreads for sandwiches or wraps – pesto, cream cheese with chives, or mashed avocado instead of just plain butter.
- Sweet Treats (Healthier Versions): Instead of store-bought cookies, try homemade energy balls, fruit leather, a square of dark chocolate, or a small portion of chia pudding.
- Dietary Swaps:
- Gluten-Free: Use gluten-free bread, crackers, or pasta.
- Dairy-Free: Opt for cheese alternatives, yogurt alternatives, and choose non-dairy spreads.
- Nut-Free: Crucial for most schools! Stick to seeds (like sunflower butter in sandwiches), roasted chickpeas, or nut-free granola bars.
- Tool Time Fun: Invest in small animal-shaped food cutters, vegetable shapers, and mini silicone molds. These simple tools can transform a plain lunch into an exciting adventure without much extra effort.
Common questions
#### How far in advance can I prepare my child’s bento box?
Most bento boxes are best assembled the night before or the morning of. For optimal freshness and food safety, aim to prepare it no more than 12-24 hours in advance. Always store it in the refrigerator immediately after packing. Items like chopped fruit (especially apples) might need a quick dip in lemon water to prevent browning if prepped too early.
#### What if my child doesn’t like their food touching?
This is precisely where bento boxes shine! Their segregated compartments are designed to keep different food items from mingling. For extra separation within larger compartments, you can use silicone cupcake liners or small, leak-proof containers for saucy items.
#### Are bento boxes suitable for hot lunches?
Some bento boxes come with insulated compartments or a separate small thermos that can keep hot food warm for several hours. If your bento box itself isn’t insulated, you can purchase a small food thermos to pack hot items like soup, pasta, or stew, and include it alongside your regular bento. Always preheat the thermos with boiling water for 5-10 minutes before adding the hot food for best results.
Classic Kids Lunch Boxes Bento
Equipment
- bento box
- small silicone cup (optional)
- leak-proof container
Ingredients
Main Ingredients
- 1 whole whole wheat pita bread cut into triangles
- 2 slices deli turkey or ham rolled up
- 1/4 cup cheddar cheese cubes
- 1/2 cup baby carrots
- 1/4 cup grapes
- 2 tablespoons hummus
- 1 mini chocolate chip cookie
Instructions
Assembly
- Place the pita triangles in the main compartment of the bento box.
- Arrange the rolled-up turkey or ham next to the pita bread.
- Add the cheddar cheese cubes to a small silicone cup or bento compartment.
- Fill another compartment with baby carrots.
- Place the grapes in a separate compartment.
- Spoon the hummus into a small, leak-proof container and place it in the bento box.
- Tuck the mini chocolate chip cookie into a small space as a treat.